
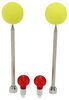
etrailer Hitch Pin Alignment Collar for 2" Hitch Accessories - Yellow
(1 reviews)
Price: $17.95
In Stock
etrailer Hitch Pin Alignment Collar for 2" Hitch Accessories - Yellow
Item # e39YR
Our Price: $17.95
In Stock


Need help with installation?
Locate installers near me- All Info
- Reviews (1)
- Q & A (0)
- Videos (2)
- Photos
etrailer Hitch Aligners - e39YR
- Collars
- 2 Inch Hitches
- etrailer
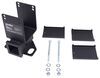
Never get on your hands and knees again to install your bike rack or ball mount in your hitch. This stop collar automatically aligns the hitch pin holes on your hitch and 2" accessory. Once installed, it doesn't need to be readjusted.
Features:
- Stop collar makes it easy to mount your ball mount, bike rack, or other accessory in your 2" hitch
- No more getting down on your hands and knees to line up the pin holes
- Easy, one-time installation
- First, slide the collar onto the shank of your accessory before inserting it in the hitch
- Next, insert the shank, line up the hitch pin holes, and secure your rack or ball mount in the hitch
- Finally, tighten down the hand knobs on the collar so it's positioned to stop your accessory in just the right spot every time you use it
- Sturdy steel has yellow gloss finish

Never get on your hands and knees to install your bike rack or ball mount in your hitch again! This collar can be mounted on any 2" hitch accessory to create an automatic stop once the pin holes on the shank line up with the holes on your hitch. It's perfect for bike racks, cargo carriers, ball mounts, tow bars, or any other 2" accessory. It installs quickly and, once installed, it doesn't need any further adjustment.
Automatic Pin Hole Alignment

This collar will prevent you from having to bend down or stick your finger into the hitch pin hole to check for alignment when installing your accessory. It also eases the burden of installing a heavy ball mount or an unwieldy cargo carrier that can be hard to wiggle back and forth to get it seated just right.
Easy, One-Time Installation

The stop collar easily installs on most 2" accessories. Just slide the collar onto the accessory's shank, insert the shank into your hitch, align the pin holes, slide the collar up against your hitch, and tighten down both hand knobs. If you run into any impediments along the shank simply unscrew the knobs, split the collar into 2 pieces, and put it back together past the point of impediment.
e39YR etrailer Tool for Lining Up Hitch Pin Holes - 2" Hitch Mounted Accessories - Yellow Powder Coat
Installation Details
California residents: click here

Video of etrailer Hitch Pin Alignment Collar for 2" Hitch Accessories - Yellow


Videos are provided as a guide only. Refer to manufacturer installation instructions and specs for complete information.


Video Transcript for etrailer Hitch Pin Alignment Collar Review
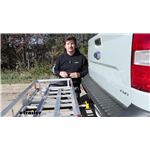
Hi everyone. Aiden here with etrailer. Today we're gonna be taking a look at the etrailer Hitch Pin Alignment Collar, available in a black color or a yellow color. They're both gonna perform the exact same function, and these ones are gonna work for your two inch by two inch shanks on your various accessories. So whether you need to hook up a ball mount, a bike rack, a cargo carrier, or any other two inch receiver accessory, like maybe a tow bar, and you want it to be easier to align that pinhole whenever you're putting that accessory into your hitch, this is gonna be really helpful. So the way this works is really simple.
You'll loosen up these hand knobs on top to open up the clamp, and this just clamps around the shank of your accessory. So we'll show it on this ball mount today. And once it's in, it'll hit up against the collar of your hitch and make sure the hitch pin hole is aligned. So the only thing we need to worry about is the first time set up. I've got it loose right now and I've got my ball mount here.
I'll slide it over that shank, put the accessory into my hitch and manually line up that hitch pin hole, pass the hitch pin through. (metal clanking) There we go. And you don't need to clip it in if you don't want to. Really, all you gotta do is then just push this up against the collar of your hitch, tighten it up as much as you can. You'll feel those lock washers begin to flatten out.
And once it's tight, this can just stay on your accessory full-time. So now let's get this pin removed and we'll show this stays in place. It's not coming off, it'll go back in, hit that, and now, boom. It aligns on the first try every time. So it's gonna really speed up the process for those heavier ball mounts, those bulkier cargo carriers and you don't have to spend so much time looking around and making sure it's aligned.
It's important to know that this will work with most two inch accessories. And the reason I say most is because most commonly it has issues with ball mounts and weight distribution heads. And the reason for that is a lot of them will have these gusset reinforcement plates here. So once it's pinned into your hitch, it leaves only so much room exposed on the outside of the hitch. You're gonna need room for this to clamp on, an inch and a half, up to like probably two inches for I'd say just the ease of use and the safety of room to have. But if you don't have enough space left over just sitting out. So this one didn't fit. Once it's all lined up, we only have about an inch of space, maybe less before this gusset reinforcement plate becomes an obstruction, meaning we can't get the alignment collar on there. And like I said, this is really common for ball mounts, but I've seen it happen a lot with weight distribution heads too, maybe even some tow bars. So just watch out for it. Measure your accessory when it's in your hitch and make sure that the closest obstacle is no closer than an inch and a half. Give yourself two inches just to be safe. So whether you end up using this for your cargo carrier or your ball mount, I think it's gonna be a really helpful tool to have in your arsenal because it can just live on that accessory and help you align the hitch pin hole on the first try every time. Because let's face it, if you've ever tried to wrestle with a really heavy steel cargo carrier, or heck, even some of the e-bike racks, they weigh almost as much as your e-bike, if not more sometimes. It's a pain, I don't wanna deal with it. I don't want to have to try to reach around and see what that hole's aligned. This tool takes the guesswork out of it. And again, it's just a really simple thing to leave on the accessory and you don't have to think about it for the rest of the use. But this has just been our look at the etrailer Hitch Pin Alignment Collar in yellow and in black. Thanks for watching.
Customer Reviews
etrailer Hitch Pin Alignment Collar for 2" Hitch Accessories - Yellow - e39YR
Average Customer Rating: 5.0 out of 5 stars (1 Customer Reviews)
Never get on your hands and knees again to install your bike rack or ball mount in your hitch. This stop collar automatically aligns the hitch pin holes on your hitch and 2" accessory. Once installed, it doesn't need to be readjusted.by: Michael 03/21/2024
Good price. Good idea. Good service. Fast shipment. Etrailer has all these trailering gadgets, some you can't find at other places. This appears to be really good quality.
1
1
See what our Experts say about this etrailer Hitch Aligners
Info for this part was:

Updated by:
Lindsey S

Installed by:
Jeff D

Installed by:
Aidan B

Video Edited:
Chris R

Written by:
Matthew S

Edited by:
Daron K

Video by:
John S
At etrailer.com we provide the best information available about the products we sell. We take the quality of our information seriously so that you can get the right part the first time. Let us know if anything is missing or if you have any questions.
Product Experts Available Now!
Call 1-800-940-8924
Thank you! Your comment has been submitted successfully. You should be able to view your question/comment here within a few days.
Error submitting comment. Please try again momentarily.