
Summer Starts Here - Save up to 70%
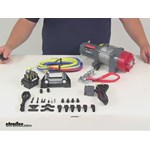
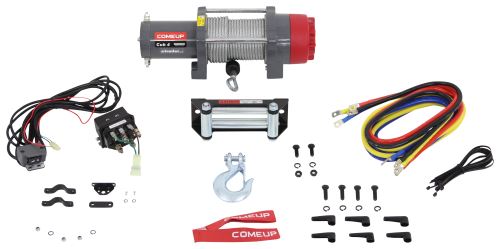
Light-duty winch with 1-hp, permanent magnet motor lets you quickly and safely recover a stuck ATV. Sealed design ensures winch operates in any environment. Dual brakes offer reliable load holding. Handlebar rocker switch included.
Features:
Specs:
This Cub 3 ATV recovery winch is designed for light-duty work and recreational applications. It's perfect for your 350cc - 500cc sport quad or small utility quad 4x4 with a maximum GVW of 1,500 lbs. The handlebar-mounted rocker switch lets you control the winch from the seat of your ATV. The motor, gearbox, and contactor are sealed for water resistance. The winch also includes dual brakes to ensure reliable load holding, a wire rope, and a roller fairlead.
This winch features a 1-horsepower, 12-volt DC motor with 3,000 lbs of line pull. The permanent magnet motor offers the same line-pulling power and speed as a series-wound motor of comparable size, but it's lighter and uses less current. The motor is sealed to keep out water, and it's constructed of durable, corrosion-resistant materials including the powder coated housing, copper battery terminals, and zinc-plated steel hardware.
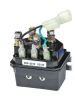
The contactor transmits power from the ATV's battery to the winch motor and to the handlebar-mounted rocker switch. It will typically be mounted with included hardware under the ATV's front cover or hood near the battery.
The 250-amp contactor is sealed to meet IP68 specifications for water and weather resistance. The copper terminals and carbon steel hardware are also corrosion resistant.
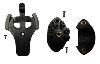
The free-spool clutch enables you to pull out the rope by hand. This saves battery power, prevents the brake from wearing down prematurely, reduces wear on the motor, and is much faster than waiting for the drum to power out the rope. To release the clutch for free-spooling simply rotate the red plastic knob 90 degrees clockwise. To reengage the clutch, rotate the knob 90 degrees counterclockwise. The white arrow on the knob indicates if the clutch is in the engaged or disengaged position.
The clutch is driven by a 3-stage planetary gear train. This provides more speed than traditional worm gear drives or 1- or 2-stage gear trains.
This winch includes both a mechanical brake and a dynamic brake. This dual braking system provides a physical brake inside the drum and supplemental braking force generated by the winch motor. The 2 brakes operate simultaneously to ensure more reliable load holding when compared with single-brake ATV winches.
The automatic mechanical brake securely holds a load and prevents unintentional payout (or creep). When the winch motor is stopped, a large spring coil inside the drum expands to press against the spring chamber. The pressure of the spring on the wall of the spring chamber creates resistance that prevents the drum from rotating. This spring contracts when the winch is in gear to allow the drum to rotate.
When the winch is pulling the rope in or paying it out, the motor is not applying resistance to the drum. When you stop powering the rope in or out, the dynamic brake uses resistance from the motor to help hold the load.
The handlebar-mounted rocker switch lets you operate the winch from the seat of your ATV. It includes mounting hardware and an 8' wiring harnesss with quick connects. There is also a wireless remote kit (CU881286 - sold separately) that lets you control the winch from up to 100' away.
The wire rope is made of high-strength, aircraft-grade galvanized steel that resists abrasions and is able to withstand harsh UV rays, chemicals, and extreme temperatures.
The rope winds around a die-cast aluminum drum. The mounting flanges are strong enough to resist bending or breaking if the rope wrap becomes uneven and excess stress is put on the drum.
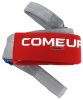
A hand-saver strap is included to use in conjunction with work gloves (CU881558 - sold separately) so that you can safely handle the rope and hook. A rock bag (CU881557 - sold separately) is also recommended for added protection. The rock bag helps prevent a broken rope from snapping back if it breaks by forcing it to the ground.
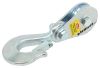
The removable steel hook is made of high-strength forged steel that is heavy duty and rust resistant. It has a spring-loaded safety latch for quick fastening and removal. The hook attaches to the steel thimble on the end of the wire rope.
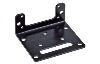
The roller fairlead has a thick steel frame with 4 steel rollers. The rollers reduce friction when you're pulling the rope in or paying it out, and they prevent the rope from becoming pinched when pulling at extreme angles. It has a black powder coat finish and zinc-plated rollers that are tough and corrosion resistant. The fairlead installs with the included steel hardware.
Note: The roller fairlead does not mount directly to the winch - it typically attaches to tabs on the ATV base plate (sold separately) or custom mounting plate (sold separately). ComeUp mounting plates and most aftermarket mounts include these tabs.
The winch is constructed of strong, durable materials that are able to withstand any weather condition or terrain. The contactor is sealed and submersible. The motor and gearbox units are made of corrosion-resistant powder coated steel, and they are sealed to keep water out. The steel tie-bars and extra-thick side frame drum supports help to create a strong and rigid winch body.
To install the winch on the front of your ATV you will need a suitable mounting location. In most cases you will need to bolt a custom mounting plate (sold separately) to the front framework of your ATV in order to mount the winch and fairlead. If you have a mounting plate that does not have tabs for your fairlead you can bolt the winch and fairlead to a base plate (CU880232 - sold separately), then bolt the base plate to your mounting plate.
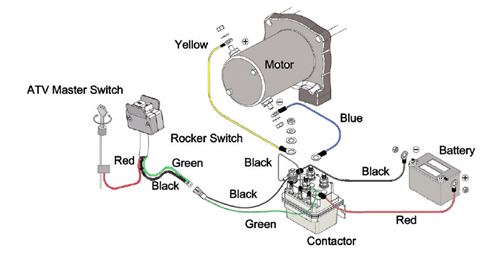
The contactor will typically mount under the front cover or hood near the battery. You will need to drill 2 small holes in the mounting surface to secure the unit with the included hardware. Black and red leads connect your vehicle's battery to the contactor, blue and yellow leads connect the contactor to the winch terminals, black and green leads connect the contactor to the rocker switch, and a red lead connects the rocker switch to the ATV master switch. The leads have quick connectors that make removing and re-installing the winch easy. Any excess wiring can be neatly tucked around the engine and secured with zip-ties (not included).
You can mount the rocker switch on either handlebar but it's typically mounted near the brake on the handlebar opposite the throttle. This allows you to control the winch and accelerate the ATV at the same time. It includes mounting hardware and an 8' wiring harnesss with built-in quick connects.
| Layers of Rope | Capacity (lbs) | Total Rope on Drum (ft) |
|---|---|---|
| 1st Layer | 3,000 | 9-5/16 |
| 2nd Layer | 2,585 | 20-1/16 |
| 3rd Layer | 2,271 | 32-1/2 |
| 4th Layer | 2,025 | 46-5/16 |
| 5th Layer | 1,827 | 50 |
The line pull capacity of your winch is determined by the maximum load your winch can pull with a single layer of rope on the drum. As more layers of rope are wound onto the drum, pulling the same load requires more force, leading to a loss in winching power. With a 2nd layer of rope around the drum, your line pull capacity is reduced by approximately 14 percent. With 3 layers on the drum, the line pull capacity is reduced by approximately 23 percent, and with 4 layers on the drum it is reduced by approximately 35 percent.
Note: It is recommended that you begin any line pull with a minimum of 5 wraps and a maximum of 2 layers of rope on the drum.
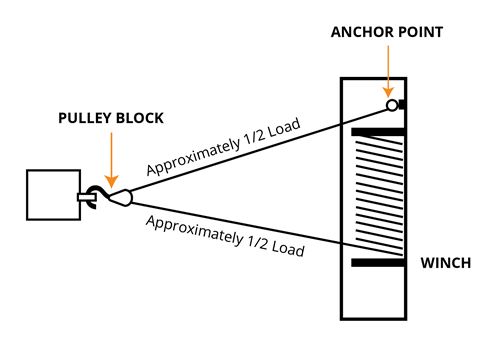
Increase the pulling capacity of your winch by doubling up the rope with a pulley block (CU881080 - sold separately). Secure the pulley block to a tree saver strap (CU881091 - sold separately) with a bow shackle (CU881092 - sold separately) to provide a strong anchor for your double-line pull. Using double-line operation will approximately double your winch's pulling capacity.
Videos are provided as a guide only. Refer to manufacturer installation instructions and specs for complete information.
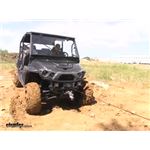
Speaker 1: Today on our 2016 Intimidator crew cab series. We're going to be taking a look at and showing you how to install the ComeUp Cub 4s Powersports UTV winch with synthetic rope, part number CU129412.This one comes in 4,000 pounds with a Hawse Fairlead and it's also available in 3,000 pounds using part number C129302 and in 2,000 pounds using part number CU122390. Now it can come also with a roller Fairlead instead of the Hawse Fairlead. And for 4,000 pounds use part number CU123922, for 3,000 use CU123529 and in 2,000 use CU122392.So here's what our wench looks like fully installed. Now this is going to allow us to undo the cable, wrap it around a tree, and help pull ourselves out or if we have something heavy that we need moved out of the way, we're going to be able to pull it with our cable as well. Our winch is going to have a clutch in it, which we can see it's in the engaged position.
And if we turn the know clockwise, it'll lock in the disengaged position allowing us to freely pull the cable out.Our winch is also going to include a hand saver strap, which is going to keep your hand from getting pinched from grabbing the clevis hook. Whenever you're using a tree to hook your winch to, you want to make sure that you use a tree saver strap. Not only to prevent damage to the tree, but you never want to rehook the winch to itself and damage the cable. Here we're using the ComeUp tree trunk protector strap. You can pick one up on our website using part number CU881091 along with a ComeUp bow shackle and that'll be part number CU881092.
One thing you want to pay attention to is you make sure you get a strap that has enough weight capacity to work with your winch. Ours here has a 30,000 pound working load, which is going to be plenty for our winch.To begin our installation, we're going to need to find the mounting location for our winch. Fortunately on our Intimidator here we already have a mounting plate preinstalled right behind the guard here. So we can go ahead and take our winch and put it into place. But before we do, I'm going to be attaching the wires to my winch, that way making it a little bit easier, so I don't have to reach in and try to reach them once it's already mounted.So if we have our winch and we have our readied knob on the right side.
We're going to have two terminals on the left side. And if we look they are color coded. We're going to have a yellow mark on one and a blue mark on the other. And those are the cables in our kit that we're going to have to put on each terminal. Go ahead and remove the nut from each one.
Then we can slide the corresponding cables in place.Now our cables are going to come with a protector. Just going to want to slide that over the end of the cable. They'll stretch so you don't have to worry about not being big enough. I'm just going to stretch it over the cable, slide it back farther than we need to right now just so we can get the cable in place. So once the terminal's exposed, we can grab our winch and since this is the blue cable going to put it on the blue terminal. Then we can replace the nut, then snug it up. Now to tighten up that nut all the way, you're going to want to grab a 7/16 wrench. Just want to make sure it's nice and snug.You have it all locked down, you're going to take your rubber cover and slide it over the terminal to make sure it's nice and protected. Then we can do the same thing for the yellow cable on the other side of our winch. To give myself a little bit more room to work, I'm actually going to remove the snorkel on the brace right here from this cross member so I can have a little bit more room and see what I'm doing. I'm just going to be using a 7/16 wrench and socket to take these bolts out. I'm just going to set it aside out of the way right back here. You're going to want to drop your cables down and you can just let them hang down right now, so they're out of the way.Then we're going to loosely put our winch into position. Just going to try to line up the holes with the plate as best you can. Now you just want to make sure your cables coming out in the right direction because you don't want to have to try to fight with that after your winch is mounted. The way we're going to attach our winch to the plate is we're going to take our grade eight bolts along with some lock washers and they're going to thread from the bottom up into the winch. Now I just want to mention it may be a little bit difficult to see, maybe a little bit difficult to reach in there. But you're going to want to make sure that you get them lined up and you get them nice and tight. Just going to take a little bit of patience and a little bit of time and once you get all four of them started, you can come back and fully tighten them up.Once you have your winch mounted and fully secure, you can go ahead and start to mount up the Fairlead. And you're going to want to take the winch cable, slide it through so you can make sure it's going to line up and sit right where you want it. Now if you look closely our holes aren't going to line up perfectly. But I'm going to go ahead and take a paint marker and I'm going to mark out the area that's going to need to be trimmed or drilled out. Try to get it as centered as I can, so I don't have to take out too much on one side or the other. I'm going to come back with a drill and a carbine bit and I'm actually just going to file that section out. Just want to keep checking each time you start filing, put that plate back up there and start testing it to make sure you don't take out too much you don't have to. With that all drilled out, you can quickly just check to see if it'll line up and they do. But since our holes got wallowed out a little bit, I'm going to be using some washers on the back side, so that our bolts don't fall through.So you're going to want to take your Allen bolt and if you need to go ahead and grab the extra larger sized washers. And coming from the back side, you're going to feed it through and then the plate is going to come up on top. We can go ahead and take the included flat washer, slide it over the bolt, the lock washer and then finally the nut. And we'll do that for the other side just so we can get our plate hanging and even, and then we can come back and tighten everything up.I'm going to come back with a half inch socket and a six millimeter Allen socket to hold the bolt on the back side. I'm going to tighten up those bolts holding the plate on. We'll go ahead and do that for the other one as well. So we're going to want to pull out the front seat cushion on the bottom. So we can get access to underneath so we can get to our battery. Now we're going to need to pull out the storage compartment as well and ours has a couple screws one on each side holding it in place. So we're going to have to find a spot to mount our contactor box. Now I do recommend putting it as close to the battery as you can. And the nice thing is all the terminals are color coded again so all we got to do is make sure that we have a nice flat surface that's not going to interfere with anything and mount our box.Now I think I'm going to mount mine right here and our battery's right here, so we won't have to worry about going too far. Now they don't provide you with any but I'm going to be using a self tapping screw and just screwing into the metal right here. Just want to remind you, you always want to double check what's behind it before you start drilling so you don't damage anything on the other side. So we'll start with our red cable here. Again we're going to take the boot and slide it over, exposing the end of the terminal so we can get it into place. You're going to want to find the red terminal on your contactor box. I'm going to go ahead and take off the nut, the lock washer, and flat washer. I'm going to slide my red cable over, replace all my washers, and the nut. Right now I'm not going to fully tighten this because we're going to wait until we get all of our cables in place, that way I can see where they need to be positioned. And I'm also not going hook it up to the battery just yet. Just going to get everything connected right here and then we can make our final connections later.We can do the same thing for our black wire, slide the boot over and around. Then we're going to find the black terminal on our box. Now there's already one wire that's connected to it. You're going to want to leave that one on there and just slide the large black wire over it and then replace all the washers and the nut. We're going to want to route the blue and yellow wire from our winch back here. Now what I'm going to do is I'm actually going to take my blue and yellow wire and I'm going to route it down where my snorkel and intake was coming from because it does go to the back. So I'm just going to start feeding it that direction and hopefully I can grab it on the other side. You just want to be mindful because the driveshaft is also right next to the snorkel there. So you just want to be mindful when you're routing the cables. You don't want to get next to any heat sources or any moving parts. You're going to want to pull all the slack out and cables and it's never a bad idea to check back up front to make sure they are routed okay.So we can go ahead and do the same thing for our yellow wire, now that we have it back here. Slide the boot over, making sure we can still reach the terminal and we're going to put it on the yellow post. Finally we'll do the same thing for the blue wire. I'm going to come back using a 10 millimeter socket and I'm going to tighten up all my terminals on my contactor box. And once I have them tightened up, I'm going to go ahead and slip the boot over and slide it back into place. Then I'm going to cover up the terminals to hopefully protect it against corrosion build up and moisture getting all over them. Now that we have this one in place, we're going to do that for the rest of them as well.our next step is going to be finding a location to mount our switch. Now on the end of our switch, we're going to have a harness that's going to plug into the contactor box. We're also going to have a red wire coming off of our switch and that's going to need to go to a power source that's only supplied when the ignition is on. That way our winch isn't going to drain our battery. Now our kit does come with several brackets that you can use to mount your switch to the side of handlebars. But since we have a steering wheel and not handlebars, we're not going to be able to use it. Now to make our application look a little bit nicer, we're going to pick up one of these momentary switches, this kind of style of switch. But it's going to be a momentary switch just like we have here. And we're actually going to be cutting the wires off of our switch and rewiring a new switch. And you can find any of those kind of switches that you like, we carry a full line of switches on our website. So just make sure that you do find one that is a momentary switch that has an off and an on or in and out if you will.Now if you don't feel comfortable cutting your switch and rewiring a new one, you can just cut a hole right here, run your wires through and attach our switch to the dash in some sort of fashion. Or cut a hole in the dash that's big enough for the switch and slide it and mount it that way. So we replaced the factory switch on our winch with part number BDW20261. Now on the back, you'll notice we have four terminals. Three of those are going to be from our original switch, which is going to be our green, black, and red wire. Now the second black wire here on the outside, that's going to be our ground. So you will need to pick up some wire and if you need some, you can pick some up on our website using part number 16-1-1. And it's going to be 16 gauge wire by the foot.Now as far as the connectors, they're just female spade connectors and you can pick some up on our website using part number DW01899-1. Now you'll also need a ring terminal to attach your ground with and you can pick one of those up using part number DW05702-1. Now when you want to cut the hole through your switch, you're going to want to cut just under an inch and a half wide by just over three quarters of an inch tall. Now it's going to be a compression fit, so you can just go ahead and take our switch and we should be able to press it in place. Now if there is some gaps, we can always come back and fill in the gaps with some silicone and seal it up nicely.So we can go ahead and start with our black wire coming out from our switch, which is going to be our ground. Which I'm going to estimate about much I'm going to need. I'm actually going to put a self tapping screw right here to this port. So we can cut our wire back, strip the end of it, and then take that ring terminal and crimp it into place. And put it right into the support better. The red wire we're going to have to find like I mentioned a power source that only is supplied when the ignition key is on. So I have my light tester here and I'm going to go ahead and I'm going to start checking some of the wires over here to see which one only has power when the ignition is on. So we can see this spade terminal with the orange wire is not getting power right now. So let me run in and turn the ignition on. So now the ignition is on, go ahead and check it again and we can see that it has power. So I'm going to go ahead and leave it on there and make sure it turns off as soon as I turn the key off.Looks like that's going to be our power source. So we can go ahead and cut back that spade terminal and we can connect our red wire. Strip back the end of our wire. I'm going to be attaching my two wires with a heat shrink butt connector. Now if you need some of these you can pick some up on our website using part number DW05744-5 and that will be for a pack of five. Just going to slip the butt connector into place over our wire. Then we can crimp it in place. We can take our red wire put it into the other end of our blue butt connector and then crimp it down. I'm going to use a heat gun to shrink down my connector. Just want to mention if you are using a open flame such as a lighter or a torch, just want to be extra careful not to burn or char the connector or the wires themselves. With all the connections made up here and our switch in place, we just need to run our connector with our green and black wire back to our contactor box. Then I'm going to take the same route I did with my blue and yellow cables.So we can go ahead and plug in our connector, make sure it locks into place. Now before we plug up our battery cables, I'm going to go ahead and clean up all my wires. Make sure they're not going to interfere or make any noise and start chafing against anything. So you can take some zip ties, zip tied to some existing wiring or whatever you need to do just to make sure that it's out of the way and it won't be ripped out when your driving through the woods. With all of our cables, except our battery cables tidied up. I'm going to go ahead and loosen up the terminals on our battery. Go ahead and remove the nut. Put our cables in place and then replace the nut and tighten it up. We'll do that for the positive post as well.With all of our wires connected and everything tidied up, we can start putting everything back together. And one last thing we need to do is put our hook on the end of our cable. Just grab a pair of pliers so they can bend this counter pin back to pull the pin out. Going to want to bend that straight. Straight enough to pull it out. Then we can take our clevis hook, slide the pin through one end of the bracket through our cable and out the other end of our hook. And take that same counter pin, feed it through, then we can bend the end over. With the hook in place, we can take our hand saver strap, open up the looped end and slide it onto the hook. And that'll finish up our look at the ComeUp cub UTV winch with synthetic rope on our 2016 Intimidator crew cab series.
Average Customer Rating: 4.8 out of 5 stars (6 Customer Reviews)
Light-duty winch with 1-hp, permanent magnet motor lets you quickly and safely recover a stuck ATV. Sealed design ensures winch operates in any environment. Dual brakes offer reliable load holding. Handlebar rocker switch included.
I’ve had this winch on an 03 Polaris sportsman 700 for a year, and so far I’ve been very pleased with it. Bought it to use with a snowplow and it worked like a champ all through last winter. Has also worked on anything I’ve needed to use it for, i.e. pulling logs, pulling out the stuck garden tractor, etc. no complaints so far, works every time.
This was the product that most closely matched the high end original winch on my Polaris ATV. The same design, dimensions and bolt pattern allowed an easy swap out. Primary use will be operation as snowplow lift. The ease of swap out slowed as I used my original mounting plate assembly that may have been thicker than a replacement. I required mounting bolts 1/4 longer than the supplied hardware.
I would recommend this as an affordable replacement winch, completed plowing and pleased with my choice.
Still going strong, have used more times than I want to admit. It has saved us over and over. Love the synthetic rope over the wire version I had prior to this.
Exactly what I was looking for. The 1 bad thing is battery cable is too short but I can extend.
Do you have a question about this Electric Winch?
Info for this part was:
At etrailer.com we provide the best information available about the products we sell. We take the quality of our information seriously so that you can get the right part the first time. Let us know if anything is missing or if you have any questions.


Thank you! Your comment has been submitted successfully. You should be able to view your question/comment here within a few days.
Error submitting comment. Please try again momentarily.