
To see if this custom-fit item will work for you please tell us what vehicle you'll use it with.
Thank you! Your comment has been submitted successfully. You should be able to view your question/comment here within a few days.
Error submitting comment. Please try again momentarily.
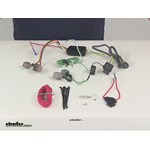
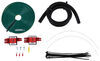
Quickly and easily install a 4-way trailer connector on your vehicle with this custom harness. T-connector plugs directly into existing wiring - no cutting or splicing required.
Features:
Specs:
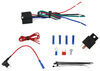
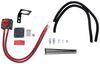
This custom-fit T-connector plugs into your vehicle's wiring harness, which is located behind the driver's-side and passenger's-side tail lights. You will have to remove the tail light assemblies to access this harness. Once you've plugged in the connector, run the red hot lead up to your car battery. Connect the included fuse holder, and then connect the fuse holder to the positive terminal on your battery.
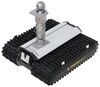
Once installation is complete, the 4-way flat connector will be stowed beneath your vehicle, near the trailer hitch. A mounting bracket (sold separately) is recommended to keep the connector secure.
It is recommended that you use a small amount of grease on all electrical connections - the plugs on your automobile and the 4-pole connector itself - to help prevent corrosion.
A tail light converter is built into this T-connector. This converter is a battery-powered unit that bypasses the electrical routes that are used by a basic wiring harness. As a result, there is virtually no draw on your tail light circuits.
Because most trailers run on a two-wire system - wherein the brake and turn signals are carried on one wire - the separate brake and turn signals from your vehicle's three-wire system need to be combined so they are compatible with the wiring system of the trailer. This converter combines the brake and turn signal functions of your automobile so that they run on one wire to properly activate your trailer's tail lights. Note: This will not affect how the tail lights on your vehicle operate.

California residents: click here
Videos are provided as a guide only. Refer to manufacturer installation instructions and specs for complete information.
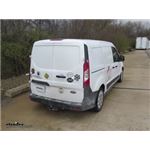
Today on our 2015 Ford Transit Connect, we're going to be taking a look at the Hopkins Plug-In Simple Vehicle Wiring Harness, part number HM11140264. Our Hopkins wiring is going to stay inside our vehicle at all times, and it's going to be right behind our spare tire tools here. Whenever we're ready to tow we can just let our 4-pole hang down, we can close our doors up, and then our wires will be ready whenever we're ready to hook up. To begin our installation, we're going to be getting in our back hatch, so I'm going to open up the doors. I want to remind you if you have anything in the back it's going to make the installation go a little bit easier and a little smoother if you clear out the back area. We come to the inside of our hatch here. We're going to remove the panel where our jack and our spare tire's tools are at.
I'm just going to pull this panel away, and if we come in here and we look up, we're going to find the connector for our taillight housing. If we push this small tab on our connector here, it's going to separate our connectors and we can get ready to plug in our T-connector. We're going to take the yellow and red wire, and that's going to be for our driver's side of our T-connector, and we're going to plug it up. Now we're going to take the provided self-tabbing screw, and our ring terminal here on our ground wire, and we're just going to find a nice spot that it's not going to interfere with anything and we don't have to worry about anything behind it. Now, right in this area seems like a good spot because we can still get our jack out and there's nothing behind there. Next, we're going to pull up our threshold right here, and that's just some pushpin fasteners holding it in place.
You can just work your way from one side to the other, pulling out, it should release it. I'm going to take my red power wire, and my green wire with my passenger side T-connectors, and I'm going to come behind this panel and route it out under here, so I can get underneath my mat. I'm just going to bring my green wire with my passenger side T-connector across my threshold. Then I'm going to come over to the side panel just like on the driver's side, but over here on the passenger's. Pop the panel open. We're going to look in the same general area for another gray T-connector, and we're going to go and disconnect it just like we did on the driver's side.
Now, our panel here has a few pushpin connectors. I'm just going to gently pull this panel away so I can route my passenger side T-connector up around the panel and up to my socket. We're going to plug in our T-connector on our passenger side the same way we did on the driver's side. I'm just going to clean up this threshold area underneath and I'm going to put a little bit of tape just for a little bit of added security. Now we can focus on running our power wire.
If we lift up our carpet, or our mat here, we're going to see two little white rubber grommets here, one on each side. Now, the one closer to the driver's side, we're going to go ahead and take a flathead screwdriver, and we're going to pop that out. We're going to take the red power wire that's provided in our kit, and we're going to strip back the end of it, and we're going to attach it to our red wire coming off of our convertor box with the butt connector that's already on our wire. We're going to crimp it down and double check and make sure our connection's tight. We're going to take the free end of our power wire, and we're going to drop it down in that hole. We're going to feed it as far down as we can and then go underneath and pull out the excess slack. Now, we're going to need to run our power wire all the way up to our battery. To help us get our wire from underneath our vehicle up to our battery here, I'm going to be taking a piece of airline tubing that I had laying around, and you can use just about anything you have laying around, whether it be a piece of airline tubing, or a coat hanger, anything that's going to keep its shape, and we're going to feed our airline tube down through our engine bay. That way we can meet up with it down below and pull it back through. When my wire came out of my grommet here, I just went along the frame, tied into a hanger and then went under the heat shield here by the rear axle, came down, followed it across the frame again, and then I went behind my heat shield for my exhaust, following it up. Then I came out right here, putting a few zip-ties along the way, and it's going to meet up with my airline tube right here. Now, we just want to be careful not to have our wire ran by anything that's going to be moving so just the axle or the power steering rack, or anything hot like our exhaust, or any other heat sources. Now we're going to take our wire, we're going to take the end of it, and we're going to tape it to our airline tube so we can pull it back through without dropping our wire. We're going to remove our cover from our battery and set this aside for now. Now, our kit does provide us with an inline fuse holder. The ring terminal and butt connector are already in place, as well as the fuse, so we're going to need to strip back in to this wire and connect it to our butt connector here, and then we'll be able to install the ring terminal on the positive side of our battery. Now, the nut holding our battery terminal on isn't wanting to come off all the way, so instead, I'm going to take my ring terminal here and I'm going to cut a small notch so I can slide it underneath. All we have left is to tidy up our wires in the engine bay as well as in the back, so when I put my grommet back in place, I made a small incision so I could put my wire in there, and then I filled it up with silicone so I know that it's going to sit right and I'm not going to have any water leakage or any issues with that. Now, if you don't have any silicone you can pick some up on our website using part number LT37467. Now on the inside of my driver's panel where I have most of my wires, I just bundled them together and tied them up out of the way, and then as far as my control box, the small tabs on each side, I used it to zip-tie to the body right here. Finally we can prepare our dust cover on our 4-pole flat, and since this wire's going to be staying inside the vehicle at all times until we're ready to tow, I'm just going to wind it up and put it in with my spare tire tools and my jack. Here we have a 4-pole tester just to make sure that our wiring is working properly, and if you don't have one of these you can pick one up on our website using part number I26. I'm going to go ahead and plug it in, and it would help if we had an extra set of hands. We're going to have them run the lights. All right, so we have our running lights turned on. You can see that's working properly, as well as our left turn signal and our right turn signal, and let's just make sure our brakes and our turn signals are working properly. We have our brake signal here as well as our brakes and left turn signal and brakes and right turn signal. That'll finish up our look at the Hopkins Plug-In Simple Vehicle Wiring Harness, part number HM11140264 on our 2015 Ford Transit Connect.
Average Customer Rating: 4.7 out of 5 stars (21 Customer Reviews)
Quickly and easily install a 4-way trailer connector on your vehicle with this custom harness. T-connector plugs directly into existing wiring - no cutting or splicing required.Short answer is yes it works fine once installed, but having to run the hot wire completely under the van to the battery is an epic PAIN! All trailer light adapters I’ve installed in the past have made all connections at the rear of the vehicle. Install video makes it sound easy with a lift in the shop, but crawling under a small low van is much more difficult for most of us.
Excellent Product and very helpful videos provided by etrailer. My first ever hitch install went smoothly and took less than an hour on my Transit connect. I had to work alone.
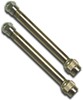
Realizing there are two different bolt sizes that needed proper placement, I fished them into place using the excellent wire threading devices provided.
I was worried that I might not be able to lift the hitch into place by myself, working under the vehicle on the floor. I used two paint cans under the two ends, to raise the hitch up closer to the frame. A brick supported the tongue.
From there it was a fairly short lift up to the frame, enough to get the nuts started, one side at a time. Make sure you lay out the nuts in the proper orientation before lifting the hitch. You do not want to be struggling to hold the hitch up, only to find you are trying to screw the wrong sized nut onto the target bolt.
I am 71 and pretty fit. If you lack strength, you may be challenged to lift the necessary weight alone. You do NOT want to drop this thing on yourself!
I also purchased the Hopkins wiring kit, which I have yet to install. The provided video quite well demonstrates what is necessary and I expect no issues.
Shipping was actually a day shorter than declared.
Highly recommended!

Hopkins S.
6/20/2017
That’s the kind of comments we love to hear William M!! Hopkins appreciates your business and we are grateful you purchased our Wiring Harness and Wiring Kit. We think you will really like these products. If you have any concerns or questions, please get in contact with etrailer customer service. Thank you!
Product was shipped in timely matter to installation facility. Was in and out in less than 30 minutes, so I will assume this hitch was a PERFECT fit since it went so fast. Product looks good on vehicle and look forward to using it.
Customer Service Review: Dealt with a couple of etrailer employees as I had questions before purchase. All were friendly and seemed very knowledgeable on their products. Also dealt with Tori via email. She kept me well informed without me even asking.
I will go out of my way to purchase products from etrailer if they have what I need in the future. Its rare that you deal with real people from beginning to end and I want you to know that it doesn't go unnoticed.
Keep up the GREAT work, and I wish your company nothing but success in the future.
Hopkins S.
7/5/2017
Hello Victor N!! Thank you for purchasing our Wiring Harness. Hopkins really appreciates your business and we are looking forward to doing more business with you in the future. etrailers Customer Service is top notch and we are pleased that you had such a great experience. etrailer customer service is available if you have any questions about this product.

Easy installation
Fast delivery good business
etrailer are great people to do business with. Great prices, service, and follow up!

Ronald W.

6/15/2019
No issues whatsoever. Works as it should. Dont hesitate to do business with etrailer, great company.
Super fast shipping and it all fit perfectly. I will not hesitate to order from etrailer.com in the future.
Couldn’t have been any easier! Everything was just clips. Having a video of my exact vehicle made it a breeze to install!
went in perfectly..
Great product and fast shipping.
Fit perfectly.
Info for this part was:
At etrailer.com we provide the best information available about the products we sell. We take the quality of our information seriously so that you can get the right part the first time. Let us know if anything is missing or if you have any questions.


Jenny N.
6/6/2023
Yep, I agree that it can be tough to route the power wire to the battery. We created a FAQ that can with that that I have linked below. I will say that while it is tempting to connect the power wire to an alternative power source, we are against it because it can overload the circuit and end up damaging the vehicles wiring.
Helpful Links
faq-Routing-a-Power-Wire.aspx