
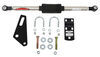
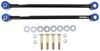
Hellwig Front Anti-Sway Bar - 1-3/4" Diameter
Item # HE43RR
Retail:$1,084.71
Our Price: $759.33
You Save: $325.38
Confirmed to Fit
2019 Ford F-53
Ford - 15,700 GVWR
Ford - 16,000 GVWR
Ford - 18,000 GVWR
Ford - 20,500 GVWR
Ford - 22,000 GVWR
Ford - 24,000 GVWR
Ford - 26,000 GVWR
Will this fit?
To see if this custom-fit item will work for you please tell us what vehicle you'll use it with.
In Stock


- All Info
- Reviews (36)
- Q & A (0)
- Videos (4)
- Photos
2019 Ford F-53 - Hellwig Front Anti-Sway Bar - 1-3/4" Diameter
- Anti-Sway Bar
- Front
- Hellwig
- Steel w Polyurethane Bushing
Minimize sway and driver fatigue by improving the stability and driveability of your motorhome. Solid, 1-3/4" chromoly bar mounts to the front axle and to the frame to balance weight transfer and reduce body roll. Includes mounting hardware.
Features:
- Minimizes side-to-side movement to improve overall stability of your vehicle
- Lets you execute turns and quick maneuvers with confidence
- Allows for a level ride, even on irregular surfaces
- Reduces driver fatigue - minimizes effort required to keep your vehicle in line
- Diminishes effects of crosswinds, passing motorists, and shifting cargo
- Made with polyurethane bushings for a longer-lasting system
- Durable and resistant to damage caused by oil, gasoline, and ozone
- Less wear means less give in the system and better support
- Includes zinc-plated mounting hardware, easy-to-follow instructions, and bushing lubricant
- Constructed of thick 4140 chromoly steel for superior strength
- Sway bar finished in corrosion-resistant, silver vein hammer tone powder coat
- Mounting brackets and end links finished in corrosion-resistant, black powder coat
- Made in the USA
Specs:
- Bar diameter: 1-3/4"
- Limited lifetime warranty
7217 Hellwig Front Anti-Sway Bar - 1-3/4" Diameter
Installation Details
California residents: click here


Video of Hellwig Front Anti-Sway Bar - 1-3/4" Diameter


Videos are provided as a guide only. Refer to manufacturer installation instructions and specs for complete information.


Video Transcript for Hellwig Front Anti-Sway Bar Installation - 2019 Ford F-53
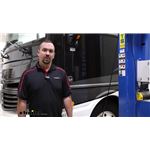
Hello, neighbors, it's Brad here at etrailer. And today, we're taking a look and installing the Hellwig Front Anti-Sway Bar on a 2019 Ford F-53 Motorhome chassis. Now, upgrading a front sway bar is gonna make a huge difference every time you drive your vehicle. I've upgraded sway bars on many of my own personal vehicles, just to give it a little bit sportier handling. But when it comes to something large like this, that's essentially a large sail going down the highway, you're gonna feel that in the steering wheel, that sway side to side, makes a little bit more white-knuckle. And also when you turn and you're kind of just feeling that top lean instead of make a nice crisp turn, that's where a sway bar comes in handy.
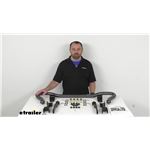
And the factory one is fine, but moving to a larger bar with a larger diameter is gonna be a great option to stiffen that up right out the gate. And this one is made out of chromoly 4140 steel. So it's great quality. You have this nice hammer tone finish. It also creates little pockets for the grease.
That way, it's going to stay lubricated. A little bit better than the flat on flat surface that you have on your factory ones, as that grease can kind of work its way out. This will trap that in there. And that grease is gonna go into these bushings. And right away, you're gonna see pretty quickly the difference.
First and foremost, urethane bushings are gonna be huge. I've upgraded bushings on my own personal vehicles. I've done plenty on RVs and it makes a world of difference. It holds up to pretty much anything you throw at it, it's not gonna break down, and it's just gonna give it a little bit more rigidity overall, which is gonna translate to more sway control. And that also kinda leads into your connecting points of the sway bar.
So factory end links on our F-53, pretty small here. So all of this can be super strong, but if it's flexing through here and this singular bracket, then it's gonna lose that sway. Whereas our Hellwig, you can tell, is quite a bit thicker, just overall super robust. We have zinc-coated hardware throughout too, so it's gonna hold up to all the weather that you throw at it. Now, this is what your front sway bar is gonna look like when it's installed on your motor home. And this is a larger diameter that replaces the factory one, not by a lot, but where I see the difference is definitely in the end links and the frame mounting. And that's kind of the cool part of this is there's no drilling required. This actually uses all the factory spots, so it really is just a bolt-in installation. Now, keep in mind, these are pretty heavy, and you're gonna be underneath your RV and you need to have your suspension compressed just as you would driving down the road. So a lot of this will probably be done on your back, so it's a little bit tricky, but overall, a step-by-step, it's not too hard to do. And I'm gonna walk you through all those steps to make sure you get it installed. So let's take a look at that. At a beginner installation, you're gonna wanna do this on the ground. You want the suspension compressed just as it would be going down the road. And we're gonna begin by removing our front sway bar that's on there from the factory. And up top, where your end link bolts into the frame, there's gonna be two bolts. We're gonna need to remove both of those, not just the end link bolt. And to accomplish that, it's gonna be a 15 millimeter socket on the outside and an 18 millimeter socket on the nut on the backside. So we'll go ahead, we'll get those removed. So if you position y`our wrench right, you can get the 18 on the backside. And then as you loosen this, it should kind of hold against the frame, and that's gonna make it a little bit easier to get this loosened up. (power tool whirring) With that hardware loosened up, go ahead, we'll get our bracket removed, and our end link should be loose here. Now, to get where our end link attaches to our sway bar removed, we have a 15 millimeter socket on the head of the bolt and then our nut is gonna be an 18. So go ahead, we'll get this removed. (drill whirring) Now before we head to our bushings to get that removed, go ahead and get your end link and bracket removed on the other side of the vehicle. Now, you don't actually have to remove the end link from the sway bar, but once you start taking these downs from the bushings, it's pretty heavy and cumbersome. So just kind of making it as light as possible and having less things just attached to, it's gonna make it easier. And plus, we don't have to worry about it catching on anything. So getting those end links outta the way is just gonna make it a little bit easier. So now, we'll head to our bushings. And pretty easy here, it's also gonna be a 15 millimeter bolt head, and then we have an 18 on the back. So we'll go ahead and get those knocked off. (drill whirring) (drill whirring) Now, obviously, as you remove the bolts on the bushing here, we're gonna make sure that it doesn't drop on us. So once you get the hardware removed, you might want to just put one bolt back in with a few threads. That way, it's gonna support itself while we get the other side taken off. (drill whirring) So now we can remove our bolts and get our sway bar, take 'em down and set aside. (metal clacking) Now where we've removed our factory end link and bracket, we're gonna be putting our new ones in, and there is a proper orientation to do this. So we're gonna be using these bolts, we're gonna pass those through those two factory holes. And we want our bracket, it should have this curvature going towards the inside, so it should get narrow with both of them installed. And we're gonna go ahead, get these hand tightened on. So I'm just gonna pass the bolts through. And something you're gonna wanna do is check to make sure that there's no buildup or any burrs or anything along those lines. We need our brackets to sit as flat as possible, so if you need to, you can kind of grind away or scrape away at that. So I'll just feed this over, (metal clacking) and then we'll take our nuts. And to get these tightened down, it's gonna be a 3/4 inch socket. Now, we're gonna be coming back with a torque wrench right after we snug 'em down. So tighten 'em down pretty good. (drill whirring) We will come back with our torque wrench. And the torque settings are found in the instruction manual. And again, I'm just using my wrench wedged against the frame to make sure that bolthead stays in place. (torque wrench beeps) And I'll torque both of those down, and then we're just gonna repeat the same process on the other side. So now we're gonna wanna get our sway bar underneath the RV. And as far as the, you can see it drops down, this hump should be facing down. So make sure you have that in the proper orientation. And we're gonna go ahead and get our U plates and our bushings in place, but we do need to make sure we grease it up. So included is the grease. Recommend getting some nitrile gloves here. We're just gonna coat this all up. Don't be afraid to go heavy. Any excess will kind of push out. And again, with that powder coat finish that they use, that's gonna hold a lot of this in, which is great. Sometimes, urethane can make some squeaky noises. And this is really gonna just kind of cut down on that. You can also do the outside where it sits in our U plate. And then this is just gonna slide over. You can see there's a split here. So just kinda get this in place here. And we'll put our U plate over this, and we'll go ahead and get the other side as well. Now, the factory hardware that we use to mount up to this, we're gonna be reusing. So have that handy, ready to go. So now take your sway bar, and we're gonna get this lined up. You might want an extra set of hands here. It's pretty hefty. Main goal is I'm gonna just get one started on each side so it's gonna support itself. So we're not gonna tighten this down because we're gonna wanna make sure that it's all centered up properly. So just get these in on both sides here. (metal cranks) So now, with this in place, we'll go ahead, we'll get our end links, and we're gonna get these fed in with our new bolts. We're gonna put a flat washer in place here, and same orientation as before. So make sure this goes from the outside towards the inside. And if you do have any of that extra grease, you can put a little bit of extra here on that urethane, kind of up to you. (metal clacking) Let me put another flat washer here. And then I'm just gonna get this hand snug on for now and then get the other side one. Now, something I noticed on this RV in particular is our AC compressor lines are gonna be rubbing against us. And in fact, the factory end link was rubbing against it. I'm not a huge fan of that. Long term, that can damage it. Now these lines, you obviously have to be very careful to not bend them or break them. So trying to get this out of the way is gonna be key, but we'll go ahead, we'll get this all tightened up. It's just a point that I would make sure that you don't have this stud rubbing against this soft line. So now at this point, I would center up the sway bar as best as possible. It should be pretty close anyway. But while we're aligning this up to our end link, you're also gonna wanna make sure that the it's even on both sides. Ours looks pretty good here. So same orientation as we did our top end link hardware. We'll go ahead and do the same here. So now, this is kind of what it's gonna look like installed, but we need to tighten everything down and these U plates are gonna be slotted. So with that, you do have a little bit of a adjustment, but what you're looking for is the sway bar to be as level as possible with the ground. So if you need to, you can raise this up a little bit to get that perfect. And once you're happy with it, snug those down. We're then gonna go to all of our hardware. The torque settings are found in the instruction manual. These are gonna be different than these ones. So as you go through, just make sure you're changing your torque settings for that. (drill whirring) Now, once you kind of snug these down, you might wanna double check and make sure that the clearances where your brackets sit on that factory spot and the gaps on the slots are nice and even. That way, it's not gonna sit crooked. So we'll go ahead, we'll get all of our hardware tightened, torqued down. Now all of our new hardware that we put in on our end links is gonna be a 15/16 socket and wrench combo. So go ahead and you can use those to get these tightened down. (drill whirring) (worker faintly speaking) (torque wrench cranks) (torque wrench beeps) So now with everything torqued down, we've officially installed our front sway bar. So you can go out, take it for a drive, and start to notice the improvement. But you do want to know that this does start to loosen up as it moves. So you're gonna wanna come back and torque those down after being able to drive it. So start enjoying your new sway bar. And that was a look and installation of the Hellwig Front Anti-Sway bar on a 2019 Ford F-53 Motorhome chassis.
Customer Reviews
Hellwig Front Anti-Sway Bar - 1-3/4" Diameter - HE43RR
Average Customer Rating: 4.8 out of 5 stars (36 Customer Reviews)
Minimize sway and driver fatigue by improving the stability and driveability of your motorhome. Solid, 1-3/4" chromoly bar mounts to the front axle and to the frame to balance weight transfer and reduce body roll. Includes mounting hardware.by: Jeff05/10/2024
Rear Sway bar by Helwig: Great, HOWEVER the flange is too rounded on the brackets provided and you cannot get a washer to fit when tightening-also cannot get a socket on to tighten, thus you cannot get a torque wrench on. Front Sway bar by Roadmaster: Great. BUT the provided new bushing that fits in the factory bracket is too thick and needs to be trimmed to fit right. BOTH of these issues SHOULD NOT have to be tolerated by a buyer of what is supposed to be an expensive quality product!!! The staff is superb but they asked me for a PRODUCT review and both brands are not impressive on the hardware.
by: Fred 04/30/2024
Really takes that rock-n-roll motion to a minimum, especially when driving out a driveway. Much beefier than the stock E450 sway bar - very pleased with this product.
by: Fred 04/30/2024
Really takes that rock-n-roll motion to a minimum, especially when driving out a driveway. Much beefier than the stock E450 sway bar - very pleased with this product.
by: Brad 03/19/2024
Sway bars are considerably larger than factory. They were easy to install and helped to control side to side sway. These bars were installed along with a rear sway bar. I would recommend these sway bars
by: Ronald 06/23/2024
Almost twice the size of my original. It was an easy perfect fit. Used the stock mounting locations as original.
by: Travis 06/13/2024
Fast shipper, quality products and installation videos too
by: Phillip 04/25/2024
Great experience. The orginal sway bar was disconntinued however Tiffani stayed on top of my order at all times with a direct replacement for my truck.
Thank you,
by: Brad 03/19/2024
Installed this sway bar along with a front sway bar. This bar is quite larger than the factory one and helped control side to side sway. I would recommend this sway bar cause it make driving our RV so much more enjoyable.
by: Luke04/17/2024
Easy installation and noticably better handling. Hope it will help when I have the drop in camper in the bed. (Already had rear Hellwig bar)
by: Scott 04/23/2024
Thank You etrailer for your prompt shipping and Expert advice and videos!!
by: Philip03/08/2024
Excellent website and easy ordering! The parts were delivered in just a couple of days; really fast process! Thanks for everything and if I need anything else, Etrailer will be the first place I look:)
by: Norman 05/04/2024
We’re in total awe that delivery occurred today. An installer has it and it will go on our truck tomorrow.
by: Michael03/31/2024
Good product no torque values on bolts in direction!

by: Tom 12/14/2023
Massive improvement over the stock sway bars!
by: Tom 12/14/2023
Massive improvement over the stock sway bars!
by: Teri 08/31/2023
As usual, etrailer was so helpful and knew exactly what part we needed for our rig. They were sent out the day they were ordered and we had them installed and are 100% pleased with the product. Our motorhome definitely feels more stable and tight with these stabilizers on them.
by: Teri08/31/2023
We ordered the hellwig front and rear stabilizers and had them installed and are 100% pleased with the stability of the rig. I did not even feel a semi passing me after we picked it up from the shop to take it back to the storage unit unlike before.
by: Lonny 03/01/2024
Great product that works to perfection on my 2020 Ford Expedition. I wanted less sway when on a less than great highway. And that’s what we have achieved.
by: Dominic 04/21/2024
Excellent , easy to install
by: William 12/16/2023
Perfect fit and felt a huge difference on the first drive. Install was straight forward with no issues. Highly recommend for all F150 owners!
by: Melton D R02/28/2024
Very good boxing
Very knowledgeable people
by: Kevin 11/14/2023
by: John 06/17/2024
by: Jeanne 03/30/2024
25
32
Show More Reviews
See what our Experts say about this Hellwig Anti-Sway Bars
- Correct Front Sway Bar For A 2013 Ford E-450 Class C RVHello Ronald. We do have sway bars that will fit your coach, but the Hellwig 7217 is for the Ford F-53 chassis and will not fit your vehicle. The Hellwig 7718 is what we recommend for your 2013 Ford E-450 Class C. Our part number for this is # HE26GR.
view full answer...
Info for this part was:

Edited by:
Lindsey S

Video Edited:
Chris R

Video Edited:
Jonathan Y

Video Edited:
John S

Test Fit:
Ryan G

Test Fit:
Bradley B

Installed by:
Andy C

Video by:
Thomas T

Video by:
Ethan H

Written by:
Sabrina W
At etrailer.com we provide the best information available about the products we sell. We take the quality of our information seriously so that you can get the right part the first time. Let us know if anything is missing or if you have any questions.
Product Experts Available Now!
Call 1-800-940-8924
Thank you! Your comment has been submitted successfully. You should be able to view your question/comment here within a few days.
Error submitting comment. Please try again momentarily.