
Replacement Square Connecting Arm for Demco Excali-Bar III or etrailer XHD Tow Bars - Right Side
(0 reviews)
Price: $259.87
Replacement Square Connecting Arm for Demco Excali-Bar III or etrailer XHD Tow Bars - Right Side
Item # DM39GV
Our Price: $259.87


- All Info
- Q & A (0)
- Videos (2)
- Photos
Demco Accessories and Parts - DM39GV
- Tow Bar
- Arms
- Side Arm
- Demco
- Passenger Side
Replaces the right connecting arm for your Demco Excali-Bar III (DM9511013 or DM9511013-BX) or etrailer XHD (e67ZR, e84ZR, e97ZR, e64ZR, e94ZR, or e57ZR) tow bar. Only works with Excali-Bar III and XHD bars that have square arms.
Features:
- Replaces the right connecting arm for your Demco Excali-Bar III or etrailer XHD tow bar
- Only works with Excali-Bar III and XHD bars that have square arms
Fits:
- Demco Excali-Bar III: DM9511013 and DM9511013-BX
- etrailer XHD: e67ZR, e84ZR, e97ZR, e64ZR, e94ZR, and e57ZR
13529-92 Replacement Tow Bar Arm for Demco Excaliber or etrailer XHD Tow Bar with Square Arms - Right Side


Video of Replacement Square Connecting Arm for Demco Excali-Bar III or etrailer XHD Tow Bars - Right Side


Videos are provided as a guide only. Refer to manufacturer installation instructions and specs for complete information.


Video Transcript for Demco Tow Bars Square Connecting Arm Replacement Review
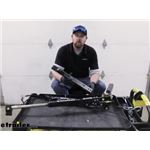
Hey everybody, Ryan here at etrailer. Today we're gonna be checking out the Demco Tow Bar replacement arm for the Demco Excali-bar 3 Tow Bars as well as the etrailer.com XHD Tow Tars. Sometimes things happen even with heavy duty type tow bars and they can get damaged and it's always an accident. You know, you never mean to do this, but it does happen. And so this is a good example of one. On this arm here, it's bent in pretty bad.
And you know even if I hold up our new arm, we know it's straight, we have a pretty big gap there. Alright, so that can cause all sorts of issues. It won't track right, This arm won't be able to retract in and out like it should. I don't really wanna push it in 'cause it's super difficult to get back out. So, but you can imagine, obviously, if the retractable bar goes in and out, if this is bent, the housing's bent, it's not gonna work the way it should.
And so, a few things can cause that. In this instance, what happened was Something got overlooked, one side of the tow bar didn't get hooked up to the base plate, and then you had one arm responsible for the load of the vehicle, right And so even though it's a heavy duty tow bar, you gotta have both sides hooked up. More commonly what we see though, a lot of times, is people reversing with their setup all hooked up and a lot of times that can cause damage to the tow bar as well. So, by having a replacement part, it's something you can just change out and not have to worry about getting a new tow bar because these are a pretty, pretty big investment. And so, if something, unfortunately, like that happens, at least there's an option to be able to get you going again and not have to pick up a whole entire new tow bar.
If you do find yourself in this predicament and you need to get a replacement arm, pay attention because these are side specific and at first, I was a little confused because these are labeled left side and right side. Today we're showing off the right side. And they're pretty much identical. Really the only difference is going to be there's a rod here on one of the arms where your electrical cable goes on. So this is gonna be considered the left side.
So if that arm's bent, this side that has the rod, you'll need the left side. If this arm is bent, like ours today, you're gonna need the right. And like I said, they're pretty much identical with the exception of that. So, just make sure you get the right one. And I also wanna mention too, if you have any other issues there's quite a few different types of replacement parts out there and you can find things like that. So for example, if you, you know, maybe one of these ends was bent or something, you can always pick that up and you know get the tow bar back in good working shape. Pretty straightforward. Other than that, you know, this is gonna be a direct replacement for those tow bars that I mentioned and it isn't going to come with any of your hardware or nothing else. This is pretty much just the housing. So, you will have to reuse these release levers here and the hardware and things of that nature. So keep that in mind when you're taking it apart, you know keep it organized and clean and that way it'll all go back together smoothly. With that said though, why don't we go ahead and take this one apart and get the arm replaced. First things first, let's start to kind of strip this one down so we can get the arm replaced. First thing I'm gonna do is get rid of our safety cable attachment tabs there. There's a couple of Allen screws. I have a 9/64ths Allen key And it looks like you don't actually have to completely remove it. I could be wrong. And it kind of looks like it just clamps the tow bar right here. We'll just go ahead, pull it completely out. And see how this goes together. This little piece, it just doesn't want to come right off. I'm gonna take a flat head screwdriver, kind of give it a little help. You can set them off to the side and get our cable out of the way for now. Now if you flip the tow bar over, we can remove our handle assembly there. So, we're gonna have these small retaining clips. Take a small flat head screwdriver and very carefully just kinda work them off. Careful doing that because those things tend to fly out fly off and you never find them. We'll drop that out and then pull the pin. Same deal with that one. Push that out. And these pieces should come outta here. And kinda rotate that out. Do your best to keep this stuff together so we remember how to put it back in. We'll set that down and then while we have it flipped over, we might as well remove some of the hardware on the bottom side of this. At the beginning of the tow bar, on each side of it, we're gonna have two screws. So eight in total. So we're just gonna remove all those. I have a 3/16ths Allen key, and we'll pull all of those out. That's six out of the eight removed. I'll flip the tow bar back over here. Get these last two out and we'll see if the arm will come off. So feels like it is. I'm gonna be really careful when I pull this off just to make sure nothing else is in there. Which it looks like we're good. So I kind of push that out of the way and then we can start to figure out how to actually disassemble this portion of our tow bar. Looks like the end piece is gonna have to come off here. So, three-quarter inch socket and a wrench. Zip that off. Let me get that out of the way. And then we should be able to take our arm here and work it out from the housing. I might have to get a hammer and some type of lubricant with the housing being bent. This doesn't want to cooperate very easily, so we might have to give it a little help here. So, to get this out I clamped our arm in a vice and I used the part there where the handle assembly goes on. 'Cause obviously if you clamp the arm then it's just gonna put more strain on it. But it's important not to actually damage this because we're gonna be reusing it. So, set up a little catch here underneath of it with some padding and some boxes if this shoots through there, lubricated it and I'm gonna take a block of wood and a hammer and see if we can't get this out. Our block of wood decided to not cooperate and break in half so I switched over to a mallet. Really, whatever you use just make sure it doesn't damage the metal there. So, feels like it's starting to come free. And we'll just continue to work this out here. This arm essentially got stuck flush. Just hitting the top with the hammer just wasn't doing it anymore. So I switched over to a brass punch so I could continue to work it out and it should come now. So it dropped down. We can clean this up, examine it make sure it's in good shape and start to put everything back together. All of the parts that I am gonna be cleaning up and applying a little bit of lubricant to, I'm actually using the tow bar cleaner and silicone RV lube that we do carry here and this stuff is formulated for these types of situations. So like I said, we'll get this cleaned up, inspect it and if it checks out we'll get it back together. After inspecting this and cleaning it up, it looks good. So we'll start to put everything back together. This will slide this into the replacement arm and then we can put this back into position. Make sure to have it positioned in a way that's gonna be set up correctly. So this is how you want it. We'll wind that back up and get it bolted down. Now, when I took these out bolts out, it looked like there was some red Loctite on the threads. So what I'll probably do is just to be on the safe side, it's definitely not gonna hurt anything, is grab some of red Loctite, put a drop, just a small drop on the threads and re-secure them. And using Loctite, a little bit goes a long way. So I'm just here to put a small drop on the threads. And what I'm trying to do is get all of these started on every side hand tight. That way everything's lined up. And then once we have that done, we'll come back and snug them down. And what I'll probably do is kind of try to rotate just to help draw everything in evenly. We can take our trigger assembly and get it put back in. So, let's see if we can't figure this out here. Sometimes these things are kinda tough to get lined back up and we can't really see it, but that feels right. I have some spring action there. All the holes are lining up so I think we're in good shape. So we'll take our pins and get them reinstalled. Once you get the lever mechanism in place, one quick way to test it to make sure it works right, is if you pull the arm all the way out, it should be locked. You shouldn't be able to push it back in. If you push in the lever it should be able to release and work properly 'til it locks in again. So, we know we got it back together right. And from there it's pretty much just reversing the process that we did before. We'll take our end, bolt that back on, and then of course get our safety cable, and the keepers, and get those back in place. Once we have that safety cable on and the end on, that pretty much does it for replacing the arm. If it we're me, you know, I'd probably like to test this. Maybe hook up in an open parking lot or somewhere where you feel safe and just put a little bit of time on it, you know, get out, check it out, make sure everything looks good and that you made a proper repair. And that'll finish up our look at and our installation of the Demco replacement Tow Bar arm for the Excali-bar 3 and etrailer XHD Tow Bar..
0
0
See what our Experts say about this Demco Accessories and Parts
Info for this part was:

Edited by:
Lindsey S

Video by:
Joshua S

Video Edited:
Jacob T

Updated by:
Wilson B

Updated by:
Carrie F

Installed by:
Michael B

Installed by:
Ryan G

Written by:
Amanda K
At etrailer.com we provide the best information available about the products we sell. We take the quality of our information seriously so that you can get the right part the first time. Let us know if anything is missing or if you have any questions.
Product Experts Available Now!
Call 1-800-940-8924
Thank you! Your comment has been submitted successfully. You should be able to view your question/comment here within a few days.
Error submitting comment. Please try again momentarily.