


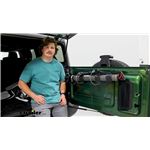
This jack mount helps you take advantage of all the space in your Ford Bronco by mounting your ARB hydraulic recovery jack (sold separately) to the inside of your tailgate. Quick release clamps hold the jack securely in place.
Features:
Specs:
Videos are provided as a guide only. Refer to manufacturer installation instructions and specs for complete information.
Hi everyone, Aidan here at etrailer. Today we're gonna be taking a look at and we'll show you how to install this ARB hydraulic recovery jack mount. This is going to be a mounting bracket that lets you get this hydraulic recovery jack out of the cargo space of your Bronco and up onto the tailgate, so it's out of the way of your cargo space, leaving room for other valuable items like slide, fridge, luggage, gear. And it's just going to be a clean place to keep it so it's a bit easier to reach and doesn't get buried by anything. But let's check it out. If you look on the tailgate of your Bronco, you're gonna have this plastic accessory ready panel.
And this bracket will just replace this, supplying new hardware and new bracketry to utilize that cutout in your tailgate to mount up the bracket. You've got these handles that you'll use to release the clamps and pins to keep those handles from loosening up on you while you drive. So when it comes time that you need the recovery jack, you just loosen up those hand knobs enough that you can open it up for both and lift the recovery jack out. Inside those clamps, there's a ton of rubber padding to keep vibration down to a minimum if at all. You shouldn't hear any metal on metal contact though, and it's gonna keep things gripped in place and held down tight.
And you can really tell this is designed to work well with ARB's hydraulic recovery jack, because those cutouts line up perfectly with those rubber bumpers on all spots. The rubber bumpers up top line up with your handle to keep it held in place and line up with this curve. So everything here is gonna be a perfect fit. If you're pairing the two together, you're gonna have a good experience. And of course we're gonna retain full function of our tailgate here so you don't have to worry about having this mounted up and it interfering with something.
The main goal is just keeping it off of the cargo area up and out of the way where you can have easy access to it. But with that in mind, you're probably wondering what that installation looks like. We're gonna walk you through the process right now. It's overall pretty simple, but you're just gonna have a few spots where you don't have good visibility, but we'll show you what that looks like now. Now to start out, we need to remove two plastic panels from our tailgate, one near the latch and one kind of near our spare tire that says accessory ready.
Grab yourself a trim tool and work from the corners. There should be some clips in those corners that you can release and just kind of help get you started. And we can pop these out and set them to the side. Now with these panels, there's two types of clips. One that's gonna be a bit easier to release and one that has more of this hook shape. So if you try to pry from the hook side, you're just gonna break the clips. So on this first panel, the side we use the trim tool on first, that's the one you wanna release and then the hooks will just pull straight out. And then for the accessory ready panel here at the back, that's going to be on the bottom side. So starting from where this plug feeds in will be the easiest. And just release the clips on the bottom before just tilting it and pulling it away so that those clips don't get damaged. In your kit, you're gonna have these two plates that look very similar, but you wanna install your silver cage nuts in all the square holes to serve as your mounting and attachment points for the main bracket. And to tell them apart, there's gonna be some identification notches at the bottom. This one is gonna have two, this one will have one. So grab the one with two identification notches right now and that'll be for our top attachment points. To make those easier to feed in, you can remove these two screws and pull out this rear door support. You'll use a T40 Torx bit for that. These screws aren't super tight, so they'll pop out pretty easily and you've got plenty of access to that support from inside that main opening that we just created. And I will say just keep close track of these because they will get reinstalled once we're done. We'll feed this in, cage nut side first. And this part's gonna be pretty tricky. Really you just have to spend some time with it trying to get it to line up. But you can see right up here, that's where that first cage nut is passing through. I'm gonna make sure it goes over this wire right here because we're trying to get all those cage nuts to line up with these slotted holes present at the top. So watching out for obstructions is pretty hard 'cause for the most part, you're going in blind here. But that wire is really the only obstruction I can feel right now. So once you have it in there, just secure it in place with one of these M6 bolts with a flat washer. That's gonna help hold it up. Only need them on one right now just to hold the whole thing in place. And these slotted holes we're shooting for are these last three here. That first one that I initially pointed to will not get used just for the top one. With that cage nut assembly held in place by one bolt and the other holes lined up, we can bring our main bracket assembly into place and line up with the same hardware, the top left corner here. And get that loosely installed just so it's kind of helping us hold everything in place. And while we've still got it loose, I can go right back to that one from step six, remove it and reinstall through the main bracket now. Now it might pivot a little bit on you and if that's the case, you can try your best to get your hand through the right side and lift it back up into alignment. An extra set of hands here could be useful though. Once those both are in though, you can just go back through and do the same thing with that middle piece of hardware now that it's all held in place. Just leave it loose for now still though, so we have some room for movement. In the process for our bottom cage nut assembly will be pretty much the same, just this time, feeding it in and lining up the bottom holes, just using the same hardware as before. Once all six bolts are in, just go back through with a 10 millimeter socket and tighten them all down. Now it's just a matter of buttoning things up. You've got the decorative cover. Just look for the ARB logo, it should go on the left side facing upright so you can read it. And then it just slides down over the main brackets that we're using to attach. You might have to just flex out a little bit on that edge where the attachment points and cage nuts on the main bracket assembly are. But again, six holes should line up right about there. And we can secure them using the provided Allen screws and flat washers. And once they're all in, tighten them up with a 5/32 Allen key. We'll then just reinstall our door support and outer plastic panel. The accessory ready one will not get reinstalled because this bracket has replaced it. With everything buttoned up, it's then just a matter of putting your jack in place and getting it mounted up. And then just secure the handle with the pin. And then it's not a bad idea just to carefully check for fitment before closing your vehicle up fully. To make sure that the jack is mounted side to side in a good place where it's not gonna be contacting your vehicle on the handle side or the foot plate side. So overall, not too bad. The install for me, I'd rather just drill personally. It's just really hard to reach. That first set of cage nuts is pretty easy to get installed because you can move the bracket around and you can see a lot better, but that second one is just a pain. I'm just gonna be real with you. At that point, I'd rather make some sort of modification just to make it a little bit easier to mount because you really just can't see what you're doing. You're going in blind. If that's something you're willing to look past though, and you like the idea of not having to modify your Bronco, then I think this kit could be a really good option for you because it does give you a clean place to keep this hydraulic recovery jack mounted, so it's ready to go and out of the way of your cargo space. Thanks for watching.
Info for this part was:
At etrailer.com we provide the best information available about the products we sell. We take the quality of our information seriously so that you can get the right part the first time. Let us know if anything is missing or if you have any questions.


Thank you! Your comment has been submitted successfully. You should be able to view your question/comment here within a few days.
Error submitting comment. Please try again momentarily.