Trailer Brakes Lock Up when Trailer is Plugged into 2015 Nissan Xterra
Question:
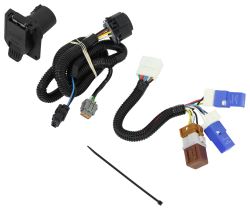
I hooked up the wiring harness the Curt one listed here # C56226 for a new camper that has a 7 pin connector. It was a very easy install. However, when I picked it up at the dealership and started to drive away the trailer wheels locked up. We disconnected the trailer to car plug and placed a tester on the car wiring plug output and it said there was a brake signal constantly being sent to the back all lights worked fine. I couldnt drive home with the brakes on but I needed lights. So I opened up the floor panel and removed the brown relay cap from the wiring harness and the brake signal stopped. I was able to then replug the camper 7 pin plug to my Xterra and drive but without trailer brakes home and here I am. I have a small 16 foot Starcraft so it wasnt really an issue but we had to take the easier flatter route home. the question is this... Do I just replace the brown cap? Can curt send me one, or is there no guarantee its the cap and not faulty Nissan wiring itself. I doubt the latter but has anyone seen these brown brake relays being faulty?
asked by: Bryan
Expert Reply:
The issue you are describing comes up now and again with certain Nissan vehicles. Apparently, depending on which plant the vehicle was built in, the brake output wire and the 12 volt power wire are reversed on the vehicle wiring harness.
Basically to fix the problem all you have to do is swap the blue and black wires inside of the Curt harness 7-Way part that plugs into the vehicle # C56226. There are a couple of ways to do this:
Repair Option 1
This option is the best for the longevity of the harness because no splices are used. For this option you will need a small screwdriver and a pick tool, a terminal release tool, or a similar tool.
First, remove the tape that attaches the conduit to the wires and pull the tubing back. Then remove the white retainer from the black housing by inserting the screwdriver between the housing and retainer. (Note the orientation of the retainer in the housing for installation later.)
Turn the connector over. Starting at the inside of the connector, insert the tool into the connector until it stops. Twist the tool outward then put downward pressure on the wire assembly in which the wire and connector will slide out. Repeat on both sides.
With the harness unpinned we are left with three pieces, the housing, the retainer and the harness. If the white gasket comes loose from the terminal it can be reinserted later during assembly.
With the locking tab up, reinsert wiring as shown. Ensure white gaskets are fully seated, replace the retainer, then reinstall the conduit, taping at the connector.
Repair Option 2
This option requires cutting both wires, then swapping and reattaching them. The best ways to ensure a proper connection and long life of the harness is to use either butt connectors or solder. In both cases, you should seal the splice with shrink wrap tubing. Begin by removing the tape and then pull back the conduit. Offsetting the splices will allow for both connectors to fit inside the conduit when finished. Measure 3" from the back of the black connector and cut the blue wire. Then measure 4" from the black connector and cut the black wire. Then cut the black wire again 2" from the back of the black connector. Discard the short section of wire, flip the connector 180 degrees and reattach the black wire to the blue and the blue to the black (make sure the shrink wrap is on the wire before connecting).
Using this method will allow the wiring to be completely concealed in the conduit, and it's weather tight. Reinstall conduit tape at the connector, near the splice.

Product Page this Question was Asked From
Curt T-Connector Vehicle Wiring Harness for Factory Tow Package - 7-Way Trailer Connector
- Custom Fit Vehicle Wiring
- Trailer Hitch Wiring
- No Converter
- Custom Fit
- 7 Round - Blade
- CURT
more information >
Featured Help Information
Instructions
Miscellaneous Media

Continue Researching
- Shop: Trailer Wiring
- Shop: Curt T-Connector Vehicle Wiring Harness for Factory Tow Package - 7-Way Trailer Connector
- Shop: Brake Controller
- Shop: Trailer Hitch
- Shop: Curt Trailer Connector Adapter with Backup Alarm - 4-Way to 7-Way RV and 4-Way Flat
- Shop: Draw-Tite Max-Frame Trailer Hitch Receiver - Custom Fit - Class III - 2"
- Shop: Curt T-Connector Vehicle Wiring Harness for Factory Tow Package - 7-Way Trailer Connector
- Article: Nissan Tow Package Wiring Harness 118266/118267 - 7 Way Harness Installed and Electric Brakes Locked
- Shop: Hopkins Plug-In Simple Vehicle Wiring Harness for Factory Tow Package - 7-Way and 4-Flat Connectors
- Video: Curt T-Connector Vehicle Wiring Harness Installation - 2013 Nissan Frontier
- Video: etrailer Trailer Jack JF-100-ZBK Review
- Video: etrailer Trailer Jack JC-101 Review
- Video: etrailer Removable Removable Poly Caster Assembly Review
- Search Results: foot plate
- Search Results: diode dynamics
- Search Results: jc~102
- Search Results: jc~101
- Search Results: 7 pin connector nissan
- Search Results: jf~100~zbk
- Q&A: Differences Between Curt # C56226 and Tow Ready # 118266 7-Way Connectors for 2012 Nissan Xterra
- Q&A: Troubleshooting Trailer Brakes Always Locked When Connected to 2014 Nissan Xterra 7-Way
- Q&A: Trailer Brakes Lock Up When Using the 7 Pole to 6 Pole Adapter # 47549
- Q&A: Solution for Needing Just Harness of Hopkins 7-Way # HM43534
- Q&A: How to Install the Hopkins HM43534 7 Way Adapter On a 2014 Nissan Frontier
- Q&A: Troubleshooting 7-Way Trailer Connection Wiring on 2017 Nissan Frontier
- Shop: Ram Removable, 6" Poly Caster Assembly for 2" Jack Tube - 1,200 lbs
- Shop: Replacement Footplate for etrailer and Ram 2-1/4" Jacks - 6-1/4" x 4-1/2" - 2,000 lbs
- Video: Redarc Tow-Pro Elite Trailer Brake Controller Installation - 2022 Nissan Frontier
- Video: Trailer Wiring Harness Installation - 2016 Nissan Frontier c56226
- Video: Trailer Wiring Harness Installation - 2006 Nissan Xterra


Sean F.
8/6/2020
I just wanted to plus one this answer. It fixed the same problem on a 2015 Xterra with a Kurt brake controller we ordered from you. Thanks!