
Summer Starts Here - Save up to 70%
To see if this custom-fit item will work for you please tell us what vehicle you'll use it with.
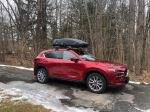
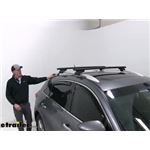
Premium, aerodynamic crossbars attach to Thule feet to create a quiet, stylish roof rack for your vehicle. Dual rubber strips in T-slots let you easily mount accessories - no trimming required. Simple to center and install with integrated scales.
Features:
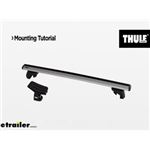
Thule WingBar Evo Crossbars 53" - Silver - Aluminum - Qty 2:Videos are provided as a guide only. Refer to manufacturer installation instructions and specs for complete information.
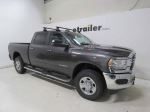
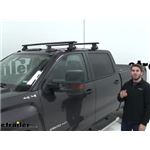
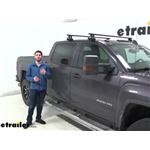
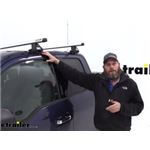
Hey guys. Today we have a 2016 GMC Sierra 2500. We're going to to test the Thule wingbar Evo roof rack system. Now this is going to be a great accessory to mount to the roof of your vehicle. It's going to allow you to haul any accessories, such as a bike, a kayak, or even a rooftop cargo basket, on your roof, create more space in the bed of your truck, and in the cab.Now this roof rack system is going to be made up of three different parts. Up top we have our 60 inch wingbar Evo crossbars.
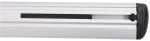
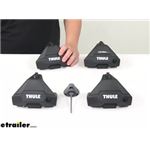
They're made out of aluminum and they're very durable. They're going to have a nice aerodynamic shape to them, help cut down on wind noise and drag when you compare it to your standard square bar system. Now have them in black on top of our Sierra. But they're also available in silver. Just see etrailer.com if you would like to have that color.Now below, kind of the middle man, is going to be our Evo feet for naked roofs.
This is what's connecting our crossbars to our fit kit. I'm going to take off the end cap, just take a quick look on the inside. Just pops right off. We see all we have is that one tightening bolt on the inside. When we tighten that down, that's going to pull the hook up into the Evo foot.
That's what pulls the roof rack down on to the vehicle.And then down here we're going to have this rubber-coated hook, along with this really thick rubber pad that's sitting between the Evo foot and our roof. That's a fit kit specifically designed for our Sierra. Now that thick rubber padding is going to help protect your roof from any type of scratches or abrasions.And the rubber coated hook is a little bit different than your standard ones that just come onto the door frame. Because when we open up our door we're going to see how it's designed to come down and get underneath our weatherstripping. You see how it just matches the curves right there of our door frame.
And it's not a big deal. All you have to do is just pull back your weatherstripping just a little bit. Get your hook down in there and then you can push it back up. It's not going to effect your seal at all. You're not going to have any leaks still, so you don't have to worry about that.Now back up here to our foot. I'm want to show you one more thing, just once we put that clamp back on. See we have these plastic locks. You can replace those with Thule lock cores which are sold separately here at etrailer.com. It's going to replace your plastic lock because you'll have an actual lock and key so that no one can remove the roof rack system without that key.Now how we got our front bar in place was we measured from the top of our windshield up to the front of our Evo foot for naked roofs. You want to do that the same on both sides, and then tighten it down.Now I'll just give you a few measurements. First I'm going to go from the top of our roof to the bottom of our wingbar. That's going to be about 3-1/4" right there. So that's plenty of space if you need any clamp on accessories or any strap on accessories under the crossbar without risking damaging your roof. If you have a sunroof on your Sierra, it's also not going to impede it's ability to open either. But you do want to make sure that you don't have it open when you're trying to install any clamp on or steel strap accessories.Now let's go from the top of the roof to the top of our wingbar. And that is going to be 4-1/4". Now why that's relevant is you want to keep in mind, because the Sierra naturally just sits higher, and some people might even have a little bit of a lift or a level kit on their Sierra, you want to make sure that any low clearance situations you've taken into account the amount of space you've added on to the top.Now when compared to the old Thule aeroblade bars, these are going to have a higher weight capacity, coming in at 220 pounds, which is a big step up. But you do want to double check with your Sierra's owners manual to make sure your roof can handle that weight.Now that we've gone over those features, let's go ahead and show you how it gets installed. Now I've got all the parts laid out you're going to need. Both crossbars are going to install the exact same way. They're going to assemble the exact same way as well. So we'll go ahead and finish this one up. We have half of it done. Flip over our wingbar. I'm going to come over and take the end cap off the side to start. Now we're going to grab our Evo foot. Flip it upside down, we see this little plastic bracket right here. We're going to grab the pad from our fit kit, put it over top, and then we're going to push down to get it to clamp on. I'm going to take a little bit of force all the way around. Just really make sure you go all the way around. Get it clamped on. There we go.Now from there, we're going to take our hook. And all you've got to do is insert it right in that slot and push up till you hear a click. Like that. Give it a couple of tugs. You know it's hooked on.Now we're going to come to the other side. We already have our scale set to the correct length specified in our instructions. So we're going to insert the Evo foot all the way up until it's touching that tab. And how you do that is you have those two silver little buttons right there. When we push down on it, that's going to release the lock that's on the top. So we can just slide it right in.So easiest way for me, and this might be easy for you, is to just over top, push down both of them, and just slide it slowly until it touches. And then let go. Once you let go, it's locked into place. It's not going to go anywhere.From there, put your end cap back on. Now we're ready to get it on our roof. When you have both back doors open, we're going to just step up and get it in place. It doesn't have to be exactly in the correct spot. Just get your hook over there. Latch it on, on both sides. And then we'll come back with our tape measure to make sure we get the correct crossbar spread.Now for our crossbar spread, we have our measuring tape. We're going to go from the front of our front crossbar to the front of our rear crossbar. You can find this measurement in your instructions. So once you have it there on both sides . We already measured the other side. We're going to grab our little foam pieces.And this is a step that we're going to skip today for demonstration purposes, but I just want to point out if you're installing this on your GMC permanently, you want to make sure you get this little foam bumper right under that second notch right there. It's got a little adhesive yellow thing on it. You take that off. There's adhesive on it. Sticks right there. Just helps protect the paint job on your Sierra. But, like I said, we're going to skip that step for now.Now we're just going to pull back on the weatherstripping a bit, like I explained earlier how the hooks work. You don't have to pull back too far. Just enough to where you can get the hook under there. Once you have the hook under there, just push up on it as much as you can around.Now we're going to start tightening down. And with this process we're only going to do a little bit at a time. We're going to go just until it's a bit snug on this side. Insert our tightening tool. Go down a little bit. And, like I said, you want to just switch sides occasionally to make sure one side doesn't pull more than the other one. So we've done that pretty snug. Go a little bit more. There we go.Now we'll switch to the other side. Do the same thing. And just go back and forth. The other side is already tightened down to the specifications. And when you hear that click, that's how you know it's tight enough.Now we'll just hop down. We want to grab our end caps. Put it on like so. Now you're ready to load up your favorite Thule accessories and hit the road.With all that being said, that's going to do it for our test fit of the Thule wingbar Evo roof rack system on our 2016 GMC Sierra 2500.
Average Customer Rating: 4.8 out of 5 stars (577 Customer Reviews)
Premium, aerodynamic crossbars attach to Thule feet to create a quiet, stylish roof rack for your vehicle. Dual rubber strips in T-slots let you easily mount accessories - no trimming required. Simple to center and install with integrated scales.
I've had the roof rack for a year now and we only use it sporadically in the winter to put the ski box ontop of the car but it works great. Very easy to install and remove and very sturdy. Previously I had the kind that bolted into the roof of my SUV and had a terrible experience with that (we lost the rack and kayaks on the freeway and it tore holes in my roof). The clamp style is the only kind we'll get from now on because they are much sturdier and no risk of losing them. Definitely recommend them.
Whisper quiet, no discernible effect on MPG, easy to use with our Thule box and racks, and looks absolutely great. Great purchase and way worth it!
I just got my packages and had it installed within the hour very satisfied
No problems installing. The rack is doing fine.
Product was right fit for my vehicle and installed perfectly. Etrailer was knowledgeable and got the goods to me quickly. Enjoyed working with them and will again.
Easy to install, fit and finish are top notch.
Excellent! Worked perfectly with the feet from my other vehicle!
I've owned this roof rack for a year now, and it has served my purposes (carrying my kayak around on my truck) quite well. It was fairly easy to assemble, largely because the entire instruction guide was in pictures.
I have had to retighten the rack a couple of times since putting it on the roof, so I tie the kayak down to the front and back of the truck as well as to the roof rack. I suspect the ocean kayak puts a bit of lift on the roof rack resulting in the loosening.
Worked perfectly on my 2020 GMC Sierra. Looks and works great.
I have almost always had roof rails on my vehicles. My F150 had no rails and I was nervous about clamp style rack holders given what I tend to carry on top. These have been great and I am positive I have overloaded them numerous times.
The Thule crossbars are a great fit. The end-caps needed a good tap with a rubber mallet to seat into place, but they are incredibly strong and easy to install.
Great quality products! Easy installation with properly guided instructions. One of the best tracking information, from ordering to delivery. Would strongly recommend etrailer to anyone looking for roof or hitch bike racks.
Thule rack looks great on my Kia Telluride. The pieces took a while to get to me because they were on backorder but it's not etrailer, they were on backorder everywhere. I messed up a piece of the rubber while installing and etrailer sent me another one free of charge. Would definitely recommend etrailer.
I’ve had my Thule roof rack for a year. It’s sturdy and easily handles two kayaks. Love it!
Easy to install with the anchors and crossbars, and still holding up great a year later.
Excellent system
I bought the Thule Evo Roof Rack to transport my kayak on my Lexus 300H. Thule will advise you on their website that his particular rack is not right for a Lexus 300H (i.e., they don't make a roof rack for a Lexus 300H); it is really for a Camry, but etrailer told me that is worked, I trusted them and they were correct. After all, a Lexus sedan is really a fancy Camry, but Thule will not acknowledge this point. It works great. Thule makes a solid product.
Superb quality. Of course, it is from Thule and they are expensive for sure. But, you really get what you pay for!
And, just consider how expensive it would be if using something more affordable (cheap generic brand) and the racks/bars take off from the roof with the box on the highway!
These will not take off, super sturdy and fits the car perfectly.
Just be sure to get the right kit.
And follow the paper instructions coming along the parts.
Can recommend these, were for Nissan Leaf 2021.
And not to forget the etrailer company, they did their part as well with flying colors. All parts arrived in time and were correct!
Sturdy and working as expected.
Seamless ordering and delivery. Video instructions very helpful
Holds everything we need and it looks g reat!
All good: shipping, install, product.
Solid foot for Thule roof rack. Used these for square bar but applicable for aero bar options as well.
Solid crossbars for my 2018 4Runner. Didn't notice any lag or noise on the freeway.
I really love my roof rack I got from this site. At first, I was having a heard time trying to figure out the right fit for my 2017 Acura MDX. I did a research only and watched videos on youtube. I even purchased the same thule roof rack from [online vendor] but it wasn't the right fit. When I made my way to this site, they not just have the right recommendation, but they also have the right parts for my vehicle. If I ever needed anything for my vehicle and they have it on this site, I will have no trouble getting it from here. I am a happy customer and I just wanted to say thank you!
Do you have a question about this Roof Rack?
Info for this part was:
At etrailer.com we provide the best information available about the products we sell. We take the quality of our information seriously so that you can get the right part the first time. Let us know if anything is missing or if you have any questions.


Thank you! Your comment has been submitted successfully. You should be able to view your question/comment here within a few days.
Error submitting comment. Please try again momentarily.