
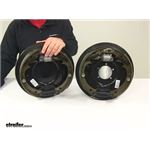
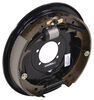
Driver's-side and passenger's-side hydraulic drum brakes feature a single-plunger design. Automotive-grade friction pads and e-coated backing plates are long-lasting. Fit 14-1/2", 15", 16", and 16-1/2" wheels.
Features:
Specs:
These trailer brake assemblies act as part of your trailer's hydraulic braking system. A hydraulic trailer brake actuator is required for these brakes to function.
These brake assemblies meet the requirements for certification by the Canadian Standards Association (CSA). The CSA creates standards, which when complied with ensure a safe and quality product. These brake assemblies underwent extensive testing to measure stopping distances when braking. These brakes have also been tested by QAI for braking performance in a complete automotive setup and under real-world conditions to provide the most realistic scenario for the everyday driver.
Each shoe on these brake assemblies is lined with automotive-grade friction material for improved stopping performance and longevity. The friction material is fully bonded onto the surface of the brake shoe. This lining is custom-molded for a perfect fit. The edges are tapered to ensure long-lasting performance. This taper, along with the circular grinding that the lining undergoes, helps to prevent cracking and crumbling. This durability helps to prevent mechanical lockup, which can occur when brake shoes are excessively worn or broken.
The friction material is also SAE-N certified, which means that it is an environmentally safe product that complies with California and Washington regulations regarding the composition of brake pads. As a result, this material not only provides high-performance braking that can endure the test of time, but it is also environmentally friendly and safe for use throughout the United States and Canada.
Videos are provided as a guide only. Refer to manufacturer installation instructions and specs for complete information.
Hi there, Surge brake and hydraulic brake trailer owners. Today we're gonna be taking a look, and showing you how to install etrailer's, hydraulic Uni-Servo drum brake assemblies. These are available with both the left and right side, so you have one for your axle here, for one axle complete. They are available and in two different sizes depending on the weight of your trailer. We're showing off the 10 inch model today, which is for 3,500 pound, but if you've got 5.2 to 7K, we'd want the 12 inch version. All right, once you've got your brake assembly disassembled, we can go ahead and install our new setup.
Even if you didn't have brakes before, if you're just taking your hub off and you're going to add brakes, you just need to make sure you do have a flange here. Now these are hydraulic brakes, so they are gonna require hydraulic lines, and an actuator to activate it. So if you're just replacing damage brakes, this is a great assembly to do so. Or if you're gonna add breaks to your trailer, just keep in mind in addition to the shoe assembly, the the whole assembly that we've got here with the backing plate, you're also gonna need your drum unless you can reuse your other drums. Now with the old drums, you do wanna make sure you measure the tolerances and make sure that it hasn't worn out of spec.
And on your drum you should see on the side of it, it'll give you a maximum diameter that the inside of that drum can have before it needs to be discarded. We're gonna be using some line kits here from Kodiak and it is a flexible line kit, so it's flexible all the way front to back. You can get this in either a single or tandem axle kit. We're just gonna be doing a single axle today just here on the front. But you could also install a full set all the way around, which would be a total of four assemblies and then that line kit would provide for that.
And then of course you need your actuator at the front. This is a boat trailer, so it's got a surge actuator, but we do have other styles for if you had a different type of trailer that wasn't a surge. We have hydraulic actuators as well that are are powered electrically and electrical hydraulic style. So we're gonna go ahead and get our assembly on here now. Now the other stuff's all the way out of the way.
This is our new assembly here. We're gonna be sliding this just into place. You do need a break flange that will accept the studs here. That's on our assembly. There's our studs. Those are gonna line right up with the brake flange. This is designed for a 10 inch break drum, so it's 10 inch assembly. And if we take a quick look at it here before we install it, we can kind of see what we get here with this assembly. So this is actually a pretty basic setup. You got your wheel cylinder there, it's just a single wheel cylinder as far as the way it expands. It only will push out on one side. It doesn't push out on both. And this gives it a leading trailing type setup where you can see that this shoe is shorter than this shoe. And the friction properties of these are slightly different. This one is designed to grab right away and the bottom of it here actually pushes with your adjuster here. It'll push this over and dig the larger shoe into the brake drum to cause it to stop. Now another thing you might notice is the adjuster here at the bottom, all you see is the adjust wheel. There are no other mechanisms there. So this is not gonna be automatic adjusting. You are gonna have to manually adjust this yourself. So now we've kind of covered a little few features of the assembly. Let's go ahead and install it here. What's nice about these is that we've got everything, we don't have to disassemble the shoes and put all these pieces back together, all of our springs and stuff. It takes a lot of special tools for those. I mean there's ways you could do it with pliers and screwdrivers, but the special tools make things a lot faster. But we don't need to worry about any of that 'cause this just is gonna slide into place over our flange there. Make sure you got all your grease and stuff out of the way. And then the studs are gonna line right up with those holes and it'll sit on there just like that. Go ahead and keep it in place, cause we don't want it to fall down, and potentially damage our spindle here. Especially this surface here. This is your grease seal surface. So this is kind of one of the most important surfaces. You don't want any damage to occur on there. So now we're gonna grab our hardware. Now if you we're replacing it, you're just gonna reuse your old hardware. But if you're adding it and you just removed a hub with no, no brakes that currently on there, you hope to provide your own. To thread on the back, we're gonna put a lock washer on there first followed by a nut. Once we get one of those on there, the assembly will hold itself in place up here so we can let go of it then and then feed our hardware onto the rest of the studs. Another thing that I didn't mention is that these are side specific assembly. So we're installing the right side with the right side. Your leading pad, leading cause it's first in the front is gonna be towards the front of the trailer. And there's also a sticker on here that is labeled right hand. So you can just use that sticker as well to help you determine that you're putting it on the appropriate side. And then you'll wanna make sure you go back and torque your hardware to the manufacturer's specifications. All right, so now that we've got all the hardware torque down there, you will need to connect your hydraulic line to the other side. But before we do that we can go ahead and assemble the drum and put it on there. Now we've got brand new ones that we're gonna be putting on today. You can get these here at etrailer. And what's nice about this drum set that we've got here is that they come prepacked. So that cap that you see there on the end is holding in our outer bearing. That one's holding in our inner bearing. You can see the grease seals already pre-installed and they come pre-packed. So it minimizes the mess and the work you gotta do, you pretty much pull those out and slide it in there. So it really does save you a lot of time, and it minimizes the mess, cause this is a messy job. I was trying to see on here if we could also see where the maximum diameter is often written on the drum. So that way if you we're checking your old one you could look for that. There's a good chance that the powder coating that's on here may have covered some of that up cause I don't see it on the assembly anymore. Sometimes it's written on the inside, but I don't see it written in there either. So we'll get our, go ahead and put our drum on. We know this one's brand new. Go ahead and pull out the cap for the inside. And take our drum here, with our bearings pre-installed on it, and slide it straight in. We're trying to go as straight as possible 'cause we do not want to nick the grease seal that's pre-installed, it'll push out the outer cap, and there's your outer bearing. So now our outer bearing, we're gonna follow that up with the washer that we took from our previous assembly, whether it was a hub, just a hub with no brakes or if it was a a drum set up, whatever you had before. There should have been a washer. Go ahead and wipe off the old grease. We don't want to have grease contamination. Slide your washer in place. It probably has a flat spot on it. A lot of them do. You need to line that flat spot up. There it is. And we'll take our nut same there, go ahead and just give that a good wipe down real quick. And reinstall the nut. And now our nut here, we don't want this to be too tight. We actually want a fairly loose fit so that way our bearings are sitting in a perfect spot, where they're really not preloaded but there's also no play. That's kind of the ideal spot is no preload and no play. But if you have to have one of the two, you typically would want to have just an ever so slight amount of play over preload. 'Cause if you preload them, you've got that pressure on them and it's digging your bearings into the races, and it'll build excess heat and may lead to premature failure. So when I usually do those, I do somewhat over tighten it in the beginning but we're not gonna leave it that way. That's just gonna ensure that our setup is fully seated and it is all the way on there. So I just use my channel lock here, kind of tighten it down, that's pretty snug. So we're good there. Now we need to back it, back off 'cause we are not gonna leave it that tight. So. Just back it off, right up until it touches just kind of hand tighten like that. I'm not even putting a lot of pressure on it. Just when I feel that pressure where it stops, that's where I want to be 'cause we already tightened it down to where we know it's fully seated on there. You can kind of see there's no gaps and stuff really it's the way it should look there. We'll clean off the retaining components. Now oftentimes you, or you should have a retaining clip. Or depending on your nut it could be a castle nut in some cases, where the nut has little slots in it, in which case you wouldn't have a retaining clip, you would just put your cotter pin in. But since this is not a castle nut, it doesn't have those. If you had a castle nut it would actually kind of have these notches that looks just like this retaining clip here made into the nut. Now we don't have that though. Now there is a hole, it's right there. That is where we're gonna slide our cotter pin through. It's a little difficult to see. We need to line up one of the opening slots here with that hole. It's covering it up. So you gotta spin it around a couple of times so you see where it kinda lines up with the cotter pin And then you can take your cotter pin, and stall it. Sometimes when you remove your cotter pin you can need to straighten it back out a little bit. We can kind of squeeze it in our pliers there a little bit. Slide that down in place there. Tap it on through if you need to. Like if You get it started. Sometimes it helps kind of twist it just a little bit, straighten it out some. All right and once you get it through we're gonna take the ears on the other side and bend those over, to ensure our pin can't come out. All right, so now that we've got that on there, you can install your cap, you do get one in the kit, and there is two different versions that you can purchase this drum in. Either an easy loop version which will have a rubber cap like you see there, or the just regular version which doesn't have the cap. Since this is an easy lube axle, it has a grease fitting there on the end. We want the easy lube version so we can just pop that rubber cap out and grease our bearings with that. And that's good for maintenance in the future. We're just gonna use our rubber mallet or dead blow to tap this into place. Just get it on there til it's fully seated. If you use a metal hammer, you will dent up that cap. It doesn't in most cases inhibit the performance too much, unless it actually drags. But most cases it just doesn't look pretty. So that's why I prefer the rubber or dead blow. So now that we've got that on there, that all looks pretty good. It rotates very smoothly. Now we're not quite done yet. We do still have to hook up our hydraulic line to our cylinder there and we will also have to manually adjust the brakes, 'cause you wanna feel like an ever so subtle drag on your assembly. And we've got absolutely no drag right now. So we're now on the backside of our drum assembly here, and our new shoe, and backing plate assembly that we installed. We need to hook up our brake line to the wheel cylinder here. So it comes with a little plug here at the bottom. You wanna pull that plug out of there. This top one is the bleeder screw. This one down here is your connection for your line. So just pull that right on out of there. And now we'll take our brake line and install it. If you need a brake line kit, we've got those here at etrailer with drum setups like this, typically you want steel lines running across your axle with the Flexos connecting to a fitting somewhere either off offset or in the middle of the axle. It just kind of depends on your trailer where the best location for that is. But this way we're gonna get plenty of clearance here with this line being able to run down. So once we get it threaded in there we can go ahead and tighten it down. We're gonna use a three eights line wrench to do so. And these line wrenches, they do have a a bend in them. I highly recommend one that has a small degree of bend over a straight one for these situations like this. So you can find the kind of the best place to get in there and access it with the biggest throw. And as I'm tightening I'm kind of holding the line just a little bit, so it doesn't twist down toward our leaf spring, 'cause we don't want our line to really contact anything. If it vibrates against something it will eventually wear through the line and leak, and we don't, we don't want that. So just get it nice and snug. You don't want to over tighten it, but you'd also don't want it to be too loose to where it leaks. That feels pretty snug right there. If we need to go further, if we see like seeping brake fluid when we're bleeding it, we can come back and tighten it down. So you're better off not over tightening it 'cause you can always go a little bit tighter. So that looks pretty good right there. You can tweak your line just a little bit if you need to, to make sure it's not gonna touch anything. And after we've got this side hooked up here, we do have one more thing we need to do. We need to adjust it, 'cause right now we can feel that there's no drag in everything. And that's also done down here at the bottom. We've got a couple of caps here. We're gonna remove the caps and then we can access the star wheel inside that we'll use to make our adjustment. Now there are break spoons that you can purchase that makes this a little bit easier. But in a lot of cases you can just use a flat bladed screwdriver to accomplish this task. So we're gonna pull off the cap. I'm pretty sure it's the one towards the rear where your adjuster wheel is. So we're just pop that one off and take a look in there. And it, it's difficult to see in there. I'm gonna pop off the other cap too, just cause it'll help let some more light in there to make things a little bit easier to see. The adjuster wheel is on the rear one here, and it is again difficult to see in there, but you'll stick your brake spoon or your flat bladed screwdriver in there and you're gonna turn the mechanism. That's your adjuster. We kind of looked at it from the outside, it was that little star looking wheel. The blade of your screwdriver or spoon is gonna gonna fit in between each of the little cogs or teeth on it. And you can use that to rotate it to either extend or retract it. Extending it is the way we need to go to bring our brakes closer to the drum. But if you, if your brakes are too tight, you would wanna retract the wheel to bring the shoes away from the inside of the drum. So we're just gonna, we're gonna rotate it here some, and then we will spin our drum and we'll see how it feels. All right, we've got just a little bit of drag now so we're going in the right direction. We want just a little bit more than we've got there but we're getting pretty close. You can kind of hear the occasional kind of a, tch, tch tch, noise. So we want just a little bit more than that. So we're gonna keep going. Okay, that is gonna be too tight. You can see that it instantly stops. I can feel we've got some drag, but that's more drag than we want. So we're getting really, really close. We're gonna go the other direction with our wheel now to reduce that some. And we're just gonna do it kind like one click at a time, till we get to what feels like a good spot. And that's a pretty good spot right there. We can, we can hear that we've got minimal drag. It does spin freely, but you can see that it does kind of slow it down a little bit and that's a pretty good spot to be in right there. You could be ever so slightly tighter or looser than this and you're gonna be in a pretty good location. But that's kind of what we want. So we're gonna pop our caps back in now and then we can head over to the other side to do the same thing. So this is a drum break set up here and you're gonna find your bleeder screw on the wheel cylinder where you hooked up your line. It should be right next to it. Now if you we're working on a disc brake set up, I've got a sample caliper here to show you. And you'll notice on the disc brake set up, this is where the line would enter, and here's the bleeder screws. Now, not all disc brake calipers are gonna have tube bleeder screws. But if they do have tube bleeder screws, you would always want to use the top bleeder screw when bleeding your brakes. And the size of the bleeder screw can vary. It looks like this is probably five 16th for this Kodiak caliper. And over on our drum break here, I know that that's gonna be a three eights in size so we're gonna be bleeding drum breaks, but again, it's the procedure's the same, it's just the location of the bleeder that you need to really pay attention to. And always use the top one. With drum breaks, you shouldn't have multiple. There should just be this one. And when I do this I, I always wanna start at the wheel that is furthest from the actuator. So we're gonna go ahead and start on the passenger side rear here. That's typically the furthest one, but depends on where your actuator's located, if it's in the center, the left or the right. So we're gonna start on this one though 'cause this is the typical, usually the furthest rear and for us it's gonna be the furthest to the rear. So now we're gonna go ahead and take our little cap off of there. Don't lose your cap, it's nice to have that on there to keep dirt, debris and stuff from filling up in here and clogging up your bleeder screw for future maintenance and things like that. So we're gonna go ahead and loosen this up. Now we haven't filled it with fluid yet, but we're gonna do gravity bleeding first to let, let nature and gravity kind of do most of the work for us here. Minimize how much we have to pump our system. So I'm opening up the bleeder screw, and I went ahead and pulled it open, just a couple of threads there. In most cases you don't need to open it that far when bleeding, but when doing gravity bleeding a little bit extra opening helps that flow, just kind of work naturally better. So you may also want to take a rubber hose and place that on there, and bring it down to your pan Because great fluid can be pretty bad for painted surfaces wearing off the paint and stuff. So we're gonna also grab a little hose and have that go down to our drain pan here just to minimize exposure, of brake fluid on our components. All right, we've slid our hose on there to direct it down into either a container or pan. We do have a container that we kind of just rigged up here. This is a just an old sports drink bottle. So this works out fairly well for something like this. But again, we have a pan under here as well just in case the hose does drip a little bit, we're catching it. So now we're gonna head up to our actuator and we're gonna go ahead and fill it up. And then let nature take its course and let gravity do the best it can to start pushing the air from the front back through our lines and out and getting that fluid there. Now even though we are gonna be gravity bleeding it, you are still gonna have to do some pumping, gravity's not gonna do all the work but it will minimize how much physical labor you have to do. So here we are at the front now, I went ahead and took the cap off of our actuator. If you look at the top here, you'll notice that it tells you what specification of fluid to use. You can use either dot three or four fluid. In this particular setup we're gonna be using dot three today. Again, you can use either. You do wanna make sure that you're using break fluid from a new container 'cause break fluid is hydro-scopic, which means it absorbs moisture. So even an open container that's been sitting for a while can actually draw that moisture out of the air. And the more moisture that is in your break fluid, the lower the boiling point is in the fluid. And we, and we don't want fluid to boil. We're gonna be careful not to spill the fluid and go ahead and fill it up. And since we're gonna be bleeding it, we're gonna get it pretty close to the top. 'Cause we are gonna be losing fluid as it goes through the system and out towards the container that we have at the back. All right, so we've got it filled up there. We're gonna go ahead and let gravity do it take its course. So you're probably gonna see some bubbles there as it starts to make its way through the system. Some of the air's gonna come to the top here. Some of the air's gonna get pushed back through that open bleeder screw we have towards the rear. We went ahead and let it gravity bleed for a while. We ended up not really getting any fluid out the back. Sometimes you do, sometimes you don't. Sometimes lifting up the front of the trailer, to make it the highest point, which it should already be the highest, but sometimes lifting up a little higher can help speed up that process or get it started. But in the event that it doesn't, no big deal. You can still pump it manually. So we've got it all topped up here. After you've got it topped up, it is a good idea to put the cap on. In a lot of cases you don't want the cap all bleeding, but we we're trying to minimize how much mess we make here, so keep it from kind of squirting back out of there. Our assistant is gonna push in, and we're gonna be at the back, and we're gonna open up the bleeder screw. So we're gonna go ahead and head to the back now to the wheel and we'll communicate with our assistant here to press. And what we want to happen is, we want our assistant to press it in. We'll open the bleeder screw, let the fluid come out or air. whatever we get out of it. We'll close it. Our assistant will then release, and then he will then press in, and we'll we will just repeat that process over and over. But we never want to have the bleeder screw in the back open when our assistant is releasing. 'Cause that's gonna draw air back in our bleeder screw. Go ahead and push it in. Our assistant's gonna press, we're gonna open and there's our fluid coming out. I can see a few air bubbles there. So we're gonna go ahead and close it back up. Okay, you can go ahead and release our assistant's now released. So then what we're gonna do. is we're gonna now have him press it again, and we're gonna open it again. And just keep rinsing and repeat, until we get a solid stream of fluid out. Every few presses you may wanna recheck your reservoir and refill the fluid 'cause you don't want it to go empty. If it goes empty up there, it's now drawing in air from the front and we don't want any air in our system. So go ahead and press. There. You can see all that air shooting outta there, so we're gonna close it. You can go ahead and release. And now that he's released you can go ahead and press again. And that was a pretty good solid stream we've got there. So we're gonna double check our reservoir, probably hit this one, one or two more times, then we're gonna head over to the other side and do that one. And you just rinse and repeat for however many wheels that you have, until you get a solid stream out of each one. Once you've got everything bled, you can go ahead and reinstall your wheels. If you purchased new drums and hubs from us, they do come with new lug nuts for half inch studs. So you can utilize those as well. We can go ahead now and tighten them down. The new nuts that it comes with is gonna be a 21 millimeter in size. And when tightening them down, you wanna do it in a star pattern. This will ensure the wheel draws in evenly and the tapered side of the nut should face the wheel, with the flat side facing outward. And once you get this back on the ground, you'll wanna make sure you torque your lug nuts to the manufacturer's specifications. And you'll see here that when I press in on the actuator with its spinning, It applies our brake, it makes it stop. And that completes our look at etrailer's, hydraulic drum break assemblies..
Average Customer Rating: 5.0 out of 5 stars (27 Customer Reviews)
Driver's-side and passenger's-side hydraulic drum brakes feature a single-plunger design. Automotive-grade friction pads and e-coated backing plates are long-lasting. Fit 14-1/2", 15", 16", and 16-1/2" wheels.Good product and description was very informative.
I ordered the part with regular ground shipping and it was to take almost a week to get it. However I received an e mail and they said they were going to expedite my order at no additional charge. I received it in just a couple of days. Little did they know I was waiting on this part to fix my boat trailer just ahead of an up coming poker run. Thank you for the great part and more over thank you for Excellent service.
John Leeuwenburg
just like the dexter one I pulled off.
This was a part that was very difficult to find, but etrailer.com came through with an exact match. Perfect from start to end. Five Stars!!!!
Shipped very quickly and was an easy bolt-on replacement. Seems to fit perfectly! Almost wish I'd ordered a replacement for all 4! Haven't road tested it yet, that will be next spring.

No issues after a year later.
Great service , great prices and was always kept informed of the shipment progress . Will definitely do business again and recommend to my friends .
fit great
very good experience
Fast easy service. Recommend this sell er.
excellent sales and customer service!
Just installed worked out nice
Good product quick delivery
Excellent service!!!!
Info for this part was:
At etrailer.com we provide the best information available about the products we sell. We take the quality of our information seriously so that you can get the right part the first time. Let us know if anything is missing or if you have any questions.


Thank you! Your comment has been submitted successfully. You should be able to view your question/comment here within a few days.
Error submitting comment. Please try again momentarily.